Who doesn't love a delicious slice of homemade coffee cake? This gluten and dairy free recipe produces a moist, rich interior with a crumbly topping!
Jump to RecipeIt's Coffee Cake Season!
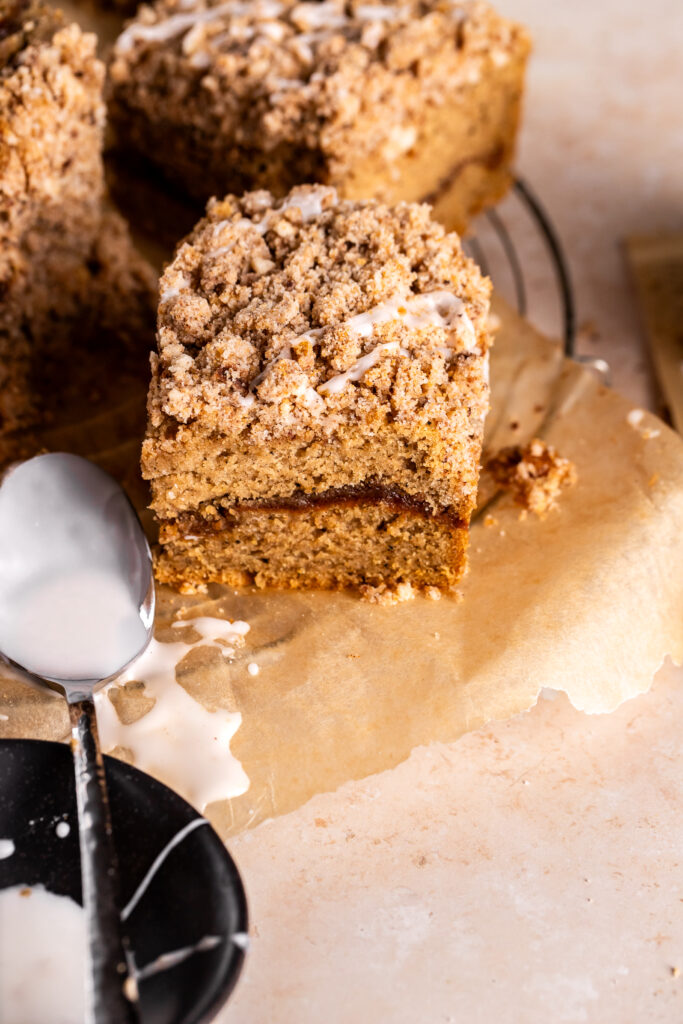
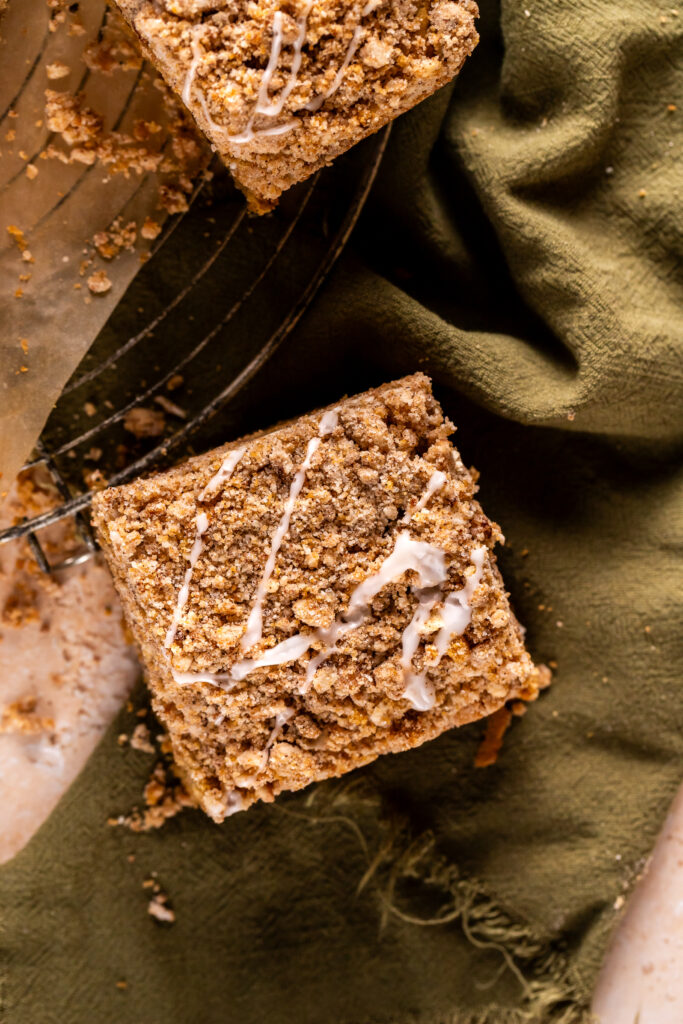
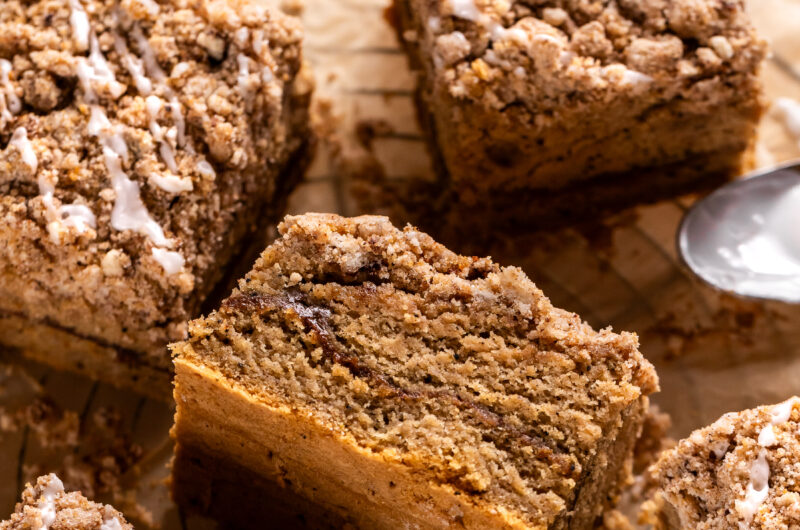
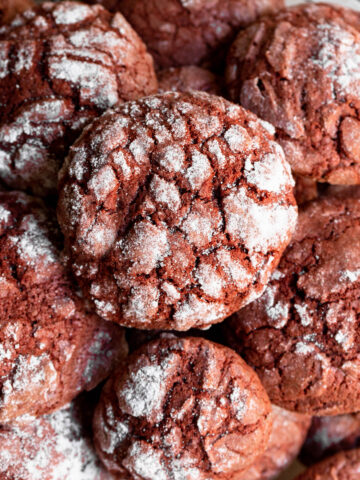
There are few things better on a gloomy, cold day than a warm piece of delicious coffee cake. And it doesn't get any better than this dairy-free and gluten-free coffee cake! This recipe features a soft interior with a streusel ribbon and crumbly topping that's finished with a drizzle of a homemade glaze. Whether you're enjoying a crumbly bite of coffee cake alongside your morning coffee or as a late night treat, there's no bad time to munch on this gluten-free and dairy-free delight.
With its cinnamon streusel filling and crumble topping, it's hard to resist this baked good. This is a great treat to make year round as it can be paired with a nice ice cream during the summer and be eaten alone during the colder months. Yet for some reason, is especially scrumptious during winter! I can assure you that this recipe will be the one you will come back to time and time again. Let's jump into the recipe that yields the BEST dairy-free and gluten-free coffee cake out there!
What is Coffee Cake?
You may be surprised to learn that there is no known credit to who invented this delicious dessert. It is believed that it came as an evolution from other sweet treats. Some think that it originated in Germany, specifically in Dresden. What we do know, is that coffee made its way to Europe during the 1600s and from there it was paired with sweet breads. These sweet breads were dressed in sweet nuts, fruits, spices and more. The "coffee cake" didn't come about until the late 1800s though.
With immigration on the rise in the 1800s, the Dutch and Germans had brought their version of coffee cake to the Americas. It wasn't until maybe the 1870's where the dessert rose to popularity in New York. Between bustling days and little break time, coffee cake was adored by many during the chaos of work. The dessert traveled across other states and as others took on the recipe, thus beginning the start of new coffee cake variations. In the 1950's the coffee cake started taking a new shape. Experienced bakers started creating decadent flavors such as apple cinnamon, pecan custard and much more.
Today there are many variations of the modern day coffee cake. While there are still many different flavors, there is a standard coffee cake recipe in the United States. This recipe typically features a ribbon of cinnamon streusel sandwiched between two layers of rich, moist cake-like batter. The coffee cake is then finished with a crumble topping made of sugar, flour, and butter. Sometimes the cake is finished with a drizzle of icing, too! So although the shape and recipe may seem, that is the traditional coffee cake recipe we know today.
The Perfect Dairy-Free and Gluten-Free Option
When we think of cake, we think of a heavy dessert. Those who suffer from some digestive issues may find cake a sacrifice for comfort. But you shouldn't have to miss out on cakes, cookies, or any dessert! So, with great joy, I bring to you a gluten-free and dairy-free coffee cake that doesn't compromise on texture or taste. It perfectly suits those with intolerances and satisfies those sweet tooth cravings!
What makes this such a great recipe is that it truly keeps the integrity of a traditional coffee cake. However, it forgoes the milk, cream, or sour cream that is often used. The main ingredients replaced here are the milk and flour! I have incorporated a gluten-free flour in place of all purpose flour and almond milk to replace the cows milk. We also use coconut oil as a diary-free alternative to butter! Ultimately, this recipe yields a coffee cake that can be enjoyed by everyone!
Creating the Cake Batter
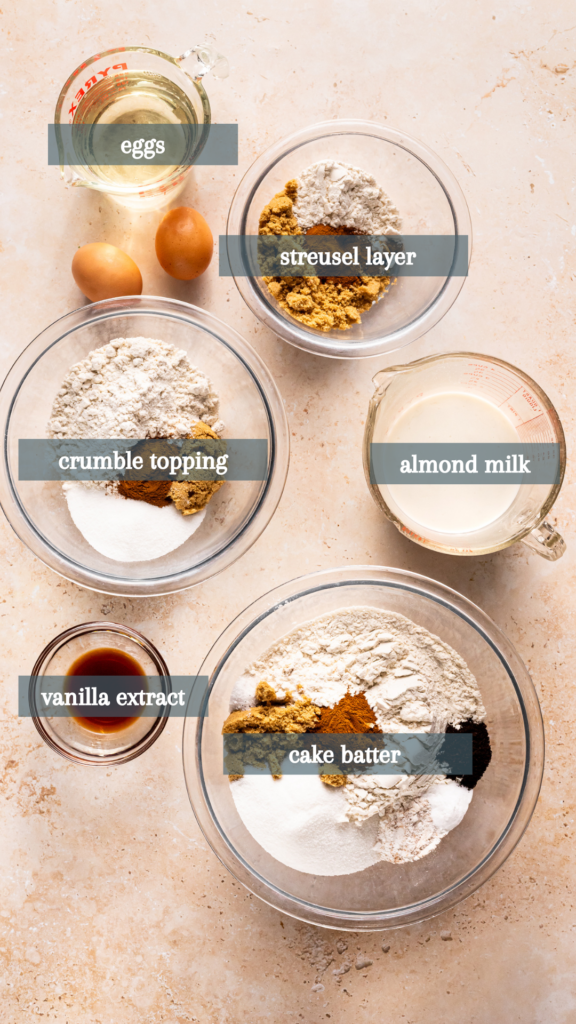
First things first: the cake batter. To make a gluten-free coffee cake, we first start with the bowl of dry ingredients. Begin by combining the flour, brown sugar, cane sugar, baking powder, cinnamon, baking soda, salt, and espresso powder. Because it is a gluten-free recipe, we'll be using gluten-free baking flour. No need for xanthin gum here as the Bob's Red Mill 1-to-1 Baking Flour covers all bases and is quite literally my favorite flour to use on all my gluten-free recipes. Less hassle and more straight forward baking!
As well, we use a blend of brown and cane sugar to yield the best flavor. The two sugars create a deeper flavor profile. Furthermore, mixing the two creates a light brown sugar with the perfect sweetness. Now, I must note that the espresso powder is my secret weapon to this delicious cake. It is the perfect addition as it creates the perfect level of coffee flavor to this cake without being overly powerful. I highly recommend using it!
Once the dry ingredients are added to a medium-sized bowl, use a fork to mix them together. While this may seem like a simple step, it's very important. This ensures that all of our dry ingredients are evenly distributed. Not only does it make a huge difference in the baking process, but also ensures that each bite is well-balanced. After the dry ingredients are combined, set the bowl to the side. We will come back to it shortly, but first we have to combine our wet ingredients!
Adding The Wet Ingredients
Now it's time to break down the wet ingredients. As we previously discussed, we will be using coconut oil in place of unsalted butter. This not only allows our recipe to remain dairy-free, but it also helps promote a sweeter flavor that isn't as heavy. Take the melted coconut oil and pour it into the bowl with the dry ingredients. Then, work the coconut oil into the dry ingredients with a fork until the flour mixture resembles pea-sized crumbles.
In a small bowl, whisk together your almond milk and lemon juice and allow to sit. This is a great hack to creating vegan buttermilk! Allow this mixture to sit for 10 minutes to create that buttermilk-like consistency and flavor. Then, whisk in two room temperature eggs and vanilla extract. While sometimes greek yogurt or sour cream is added here for a classic coffee cake, we're going to avoid using these products to keep our recipe dairy-free. As well, you'll find that this moist cake doesn't even need those additional ingredients!
Last but not least, it's time to combine the two! Pour the wet ingredients into the dry ingredients. Then, use a mixer on medium-low speed to combine the ingredients. You are looking for a thick and creamy texture. You should only need to mix for a minute or two max to obtain the desired consistency. Ensure that you don't mix longer than two minutes and don't mix on medium to high speed as this can change the outcome of the texture. Once thoroughly combined, set the batter to the side.


Discover the Streusel Layer
Before we pour the batter into the pan, we must make the middle streusel layer and topping. These two layers are crucial to the flavor of the coffee cake! But first, what is a streusel? In baking, a streusel is a crumble mixture of flour, butter and sugar that is usually a topping to muffins, cakes, breads, and more. This technique creates a unique texture to the tops of delicious desserts.
Some crumble recipes include spices or nuts, and can also be incorporated in as a "ribbon" inside a dessert. This basically just means that you layer it into the batter. This is exactly what we will be doing for this recipe. We will be using both the ribbon technique and utilize the crumble on top as well. This will make for the perfect coffee cake texture!
Note that won't be adding coconut oil to our middle streusel layer. This is because we want the sugar to melt when the coffee cake is baking. As well, the coconut oil in the dry ingredients and crumble is used to hold the dry ingredients together. So, in a small bowl, we will combine the brown sugar, gluten-free flour and cinnamon. Mix to combine, then set to the side.
Why the Crumble is So Important
At last, it's time for the crumble topping! This is going to make that top layer of our coffee cake extra delicious and give it a certain soft type of "crunch". I say soft crunch because it isn't as crunchy as say granola, rather it's a lot softer and sublte. The crumble adds so much texture and flavor to our coffee cake! It's truly a crucial part of this coffee cake. To make the signature crumble, combine gluten-free baking flour, brown sugar, cane sugar, melted coconut oil, and cinnamon. Mix together until a crumbly texture forms.


Building the Layers of Flavor
Let's finally create these layers! Start by preheating the oven to 350 degrees Fahrenheit and greasing a 9" square baking pan. I like to grease it, then lay down two sheets of parchment paper to cover the four sides. This ensures that the coffee cake won't stick to the bottom of the pan and makes for much easier removal! But you can also just grease the pan and then dust it with flour. If you do use the parchment sheets, remember to clip the sides until you fill it with batter to prevent the parchment from moving.
Next, spread half of the cake batter over the bottom of the parchment paper. Make sure you gently get any air bubbles out by tapping your baking pan on the counter top. This will ensure that the batter lays perfectly smooth. Then, add in the middle streusel layer. Go ahead and dump it all in! Spread out evenly to make sure every bite is perfectly uniform. Next, layer your remaining batter on top. This part can be tricky because it wants to stick to the streusel. But just work slowly and use a spoon to help. Finally, finish off with your crumble topping. This completes your preparation, now for the baking!
Baking the Perfect Dairy-Free and Gluten-Free Coffee Cake
Time to transport your beautiful, dairy-free, and gluten-free coffee cake to the oven. Make sure it sits on the middle rack to ensure even baking. You might get an unevenly baked coffee cake if you place it in any other position! So, to avoid that, be sure that one of your racks are in the middle position. Finally, bake your cake for 45-50 minutes at 350 degrees Fahrenheit.
Once the coffee cake has baked for the allotted time, remove it from the oven and allow it to cool. I suggest waiting an hour for it to cool before cutting into it. This will allow it to set so the topping isn't extremely crumbly. Trust me on this, you will want to wait for the absolute best results. Also, it will allow the flavors to fully develop and deepen. Kind of like how brownies are always so much more flavorful after they've sat out for an hour!


How to Make the Glaze
The absolute last step, I promise! Well, you are more than welcome to skip the glaze, but I find it to be that much more enjoyable with a nice little something on top. It pairs beautifully with the crumble on top and really enhances the flavors. Also, it really only takes a minute or two to whip up. Then, you can drizzle it over your coffee cake and enjoy!
So, to prepare the glaze, you will need your powdered sugar, almond milk and vanilla extract. Mix the three ingredients together and voila! Just make sure to sift the powdered sugar into the bowl. This will help prevent clumps and ensure the glaze is smooth. You have your easy two-minute glaze for your gluten-free coffee cake. Take your glaze and drizzle it across the whole cake to finish it off. Including the glaze will not only boost the flavor, but it gives extra points for presentation.

How to Store This Coffee Cake
In my opinion, this coffee cake yields the perfect number of servings. You can either cut it into nine large squares or 12-16 small squares, if you're looking to create the perfect individual bite. I find that cutting it into nine large squares provides me with the ideal size for breakfast, snack time or dessert to last almost a full week! Although, they hardly last that long in my house!
Storing this gluten-free coffee cake is an easy task. So do not fret! All you need is an air tight container to ensure that the cake doesn't spoil. I suggest storing the cake for no more than six days. Although there isn't dairy in this recipe, I wouldn't recommend going any longer than that. As well, ensure you store at room temperature instead of in the refrigerator as the refrigerator will dry out the coffee cake. When you are ready to dig in once again, just reheat your slice in the microwave for 30-45 seconds before serving. You can certainly eat the cake without microwaving, however I think it's a lot better when warm!
What To Serve This Coffee Cake With
Obviously, coffee cake pairs beautifully with coffee or tea. This is a great way to enjoy a slice of coffee cake for breakfast! It is a fool proof, simple and fast pairing that will get your mornings started on the right foot. It's also great to enjoy on its own as a snack! It's always nice enjoying some leftover coffee cake as a snack throughout the next few days as it brings a little extra joy to the middle of your day. This is especially true on gloomy or rainy days!
But there are so many other ways to utilize it alongside other dishes! Here are a few ideas for what to pair this tasty dessert with!
- Creamy, Paleo Carrot Pasta: This creamy, vegan, gluten-free, and dairy-free recipe is the perfect light pasta dish! Topped with crunchy gluten-free breadcrumbs and a zesty gremolata made from fresh carrot tops, it doesn't get much better than this. After dinner, enjoy a delicious slice of coffee cake to close out the night.
- Roast Chicken: My favorite aspect about this whole roasted chicken is the crispy skin and juicy meat. In just under an hour, you can have a perfectly cooked chicken to serve up with rice and/or veggies! This chicken is great accompanied by this coffee cake as dessert!
All in all, this gluten-free coffee cake is great paired with others or on its own! An easy recipe to impress and enjoy for days to come. I hope this recipe brings you joy as it does me!
Dairy-Free and Gluten-Free Coffee Cake
Course: Dessert, Breakfast, Brunch, SnacksDifficulty: Easy9
servings20
minutes45
minutesWho's ready for a slice of this delectable dairy-free and gluten-free coffee cake?
Ingredients
- For the Cake Batter
3 cups of gluten-free baking flour
½ cup pure cane sugar
½ cup light brown sugar
1 tablespoon baking powder
1 tablespoon cinnamon
1 teaspoon baking soda
1 teaspoon coffee or espresso powder
½ teaspoon salt
1 cup coconut oil, melted
1 ½ cup of almond milk
1 tablespoon lemon juice
2 eggs, room temperature
2 teaspoons vanilla extract
- For the Middle Streusel Layer
¾ cup brown sugar
¼ cup gluten free flour
1 tablespoon cinnamon
- For the Topping
1 cup of gluten-free baking flour
½ cup brown sugar
½ cup cane sugar
¼ cup coconut oil, melted
1 tablespoon cinnamon
- For the Glaze
1 cup of powdered sugar
2 teaspoons almond milk
1 teaspoon vanilla extract
Directions
- For the Streusel
- Combine your brown sugar, flour and cinnamon in a small bowl. Set aside.
- For the Cake Batter
- Preheat the oven to 350 degrees Fareinheit and grease a 9" by 9" baking pan
- In a large bowl, combine the flour, cane sugar, brown sugar, baking powder, cinnamon, baking soda, espresso powder and salt. Mix together with a whisk or fork to throughly combine all the dry ingredients.
- Next, add the melted coconut oil to the dry ingredients and use a fork to work until the dry ingredients resemble pea-sized crumbles.
- In another bowl, whisk together the almond milk and lemon juice. Allow to sit for 10 minutes to create a vegan buttermilk. Then, whisk in the eggs and vanilla extract.
- Slowly combine the wet and dry ingredients with an electric mixer for 1-2 minutes on medium-low speed.
- Once the cake batter is thick and creamy, spread half of the batter into the prepared baking pan. Reserve the rest for later.
- Sprinkle your streusel layer on top of the batter, and finish with your remaining batter on top. Use a spatula or spoon to evenly spread it over the streusel layer.
- For the Topping
- In a small bowl, combine the flour, sugars, coconut oil and cinnamon. Use a fork to combine until pea-sized crumbles form.
- Sprinkle over the batter in the baking pan. Try to spread the crumble topping as evenly as possible.
- Bake the coffee cake for 45-50 minutes on the center rack. To test if it's done, stick a toothpick in the middle and if it comes out clean, then remove the coffee cake from the oven.
- Finally, allow to cool for at least one hour before slicing. Preferably cool for 30 minutes in the pan and 30 minutes on a wire rack.
- For the Glaze
- Sift your powdered sugar into a small bowl.
- Then, add the almond milk and vanilla extract. Whisk to combine until smooth and silky.
- When your coffee cake is fully cooled off, drizzle your glaze over the top and enjoy!
Recipe Video
Notes
- Store the coffee cake in an air tight container for no more than six days. The coffee cake should be stored at room temperature- NOT refrigerated.


[…] Gluten-Free Coffee Cake – The Bottomless Pit […]