Whether you're looking for the perfect snack for game day or an easy appetizer for your next party, this Mild Jalapeño Popper Dip is about to become your go-to recipe.
Pass the Dip Please!
I may be biased but I think the best part of any party is the food, especially a football or Super Bowl party! You can always find me near the snack table at these events. There's just something about watching sports and eating wings, dips & pigs in a blanket. The two just go hand in hand!
When it comes to fun gatherings, we often opt for a store bought item, out of convenience, to contribute to the party. However, bringing something homemade feels different. There is a sense of pride when people love your homemade recipe. And I guarantee you that this Easy & Mild Jalapeño Popper Dip will be loved by all! It'll have everyone digging in, and ultimately leaving no leftovers in sight. And as the name suggests, this dip is a breeze to make!
So, if you're planning your next game day party and looking for the perfect easy dish to bring, this is for you! This low maintenance and quick recipe comes together in less than an hour and yields an addicting result. Not to mention, this Jalapeño Popper Dip is filling without being too heavy, gluten-free, and mild in spice but loaded with flavor! Not everyone can handle spice, and I'm definitely in this category. So if you're like me and love the flavors of jalapeños but not the heat, this dish is perfect for you.
Jump to:
- Pass the Dip Please!
- What's in a Jalapeño Popper Dip?
- The Wonderful Flavors
- What Makes This Recipe So Good?
- Ingredients
- Why Greek Yogurt?
- Preparing the Jalapeños and Other Ingredients
- Building the Flavor Profile
- The Filling of the Dip
- The Final Step: The Topping
- Cleaning Your Cast Iron Skillet
- What To Do With Leftovers
- How To Turn This Dip Into Chili
- The Perfect Pairings
- Related
- Easy & Mild Jalapeño Popper Dip
What's in a Jalapeño Popper Dip?
This dip is derived of the classic bar snack, the jalapeño popper. While there are a lot of different variations of this appetizer, the classic jalapeño popper consists of a sliced jalapeño stuffed with cream cheese and cheddar cheese. Sometimes the jalapeño is then wrapped in a slice of bacon before being cooked. Other times, the jalapeño isn't sliced in half and instead is hollowed out and stuffed, then fried. Like I said, there are some many delicious variations!
So, let's talk about the dip. Much like its origin, the dip has countless recipe variations. The common theme is a mixture of roasted and diced jalapeños, cream cheese, and cheddar cheese. Green chilis, breadcrumbs, bacon, and mayonnaise are all potential additions. Again, it really just depends on your preference! That's one of the many great things about this dip, there's so many possibilities!
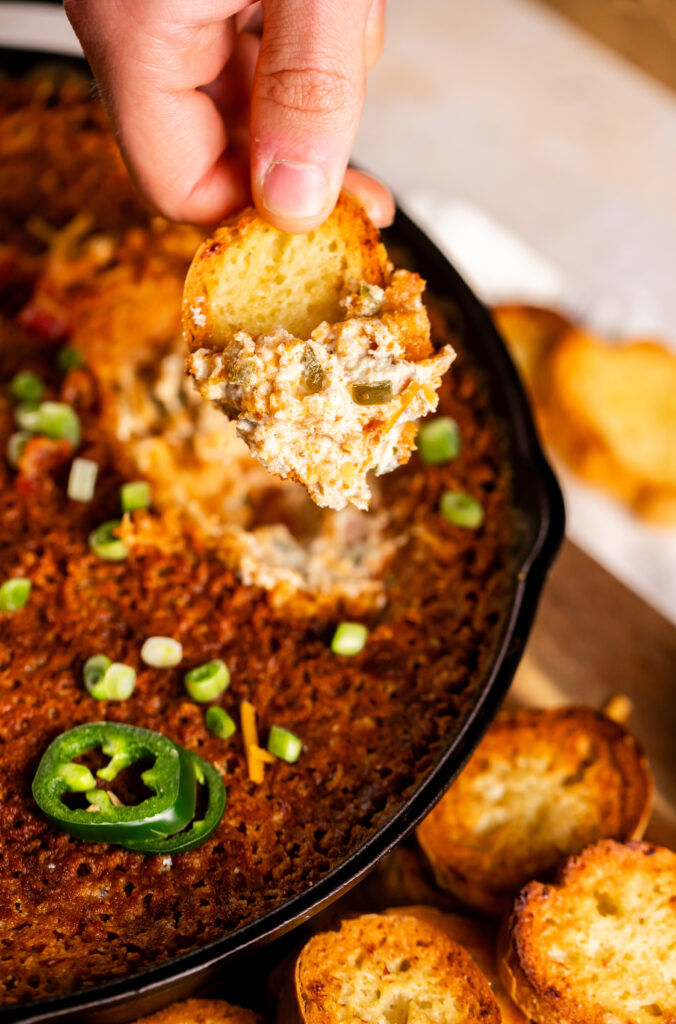
Essentially, this recipe combines two classic snacks into one delicious end result. We have all of the jalapeño popper flavors built into our tasty dip recipe. This combination makes for a very flavorful dip filled with cheese, bacon, spices and so much more! Plus, with an added layer of a crust on top, the consistency ticks all of the boxes. Creaminess and crispiness wrapped into one, this dip will have you hooked!
The Wonderful Flavors
The flavor profile of this dish is indescribable! With such strong ingredients, you know right off the bat that this dip is nothing short of flavorful. First, there are savory notes from the bacon, garlic, and shallot. This gives the dip that warm, cozy flavor that makes dips so hard to resist. The shallot and garlic go hand in hand here. Some would describe a shallot to resemble the taste of an onion with a hint of garlic at the very end. However, when cooked, they add a sort of sweetness to the dip.
The bacon also acts as the salty component to our flavor profile. And because we utilize the bacon to its fullest potential, there's no added salt in this recipe. Any excess salt is balanced by the creaminess of the cream cheese and greek yogurt. The cream cheese plays on the sweetness of the shallot, and works well with the parmesan and cheddar cheese in this dip. Furthermore, the unsweetened greek yogurt adds a bit of tang to this dish. This tang is enhanced by the zest from the lime juice.
Next up, we have the spicy components that consistent of the classic jalapeños and green chilis. The jalapeños are going to add a mild hint of heat to our dip. You are able to turn up the heat, if desired, by incorporating the seeds and/or adding more jalapeños! The choice is yours. The green chilis will add a bit of an earthy, smokiness to the jalapeño popper dip. The chilis and jalapeños work beautifully together to create a robust element of mild spice.
All in all, the combination of these ingredients in this dish compliment one another beautifully. If you love a good savory dip with a tiny bit of heat, then this Jalapeño Popper Dip is for you! Even those who can't tolerate an ounce of spice find this dip perfectly balanced. Unlike other variations of this recipe, you're able to fully enjoy the flavors without being overpowered by an unreasonable spice level. This dip is truly made for everyone!
What Makes This Recipe So Good?
Now that we've covered the basic ingredients, you may be wondering... what makes this Jalapeño Popper Dip recipe so good? As I mentioned, this dish is perfect if - like me - and have a low tolerance for heat. Unlike other recipes, the jalapeño to cheese ratio is skewed towards the cheese! So, this dip is much more mild compared to others. While you can still taste the notes of the jalapeño, we're not going overboard here with the heat.
Second and most important, this recipe truly builds on layers of flavor in each step. This is all due to using a cast iron skillet and utilizing our ingredients in a particular way to further enhance the flavor profile. A cast iron skillet is special because its "seasoning" comes from cooking other foods. Seasoning is a layer of oil that makes for a non-stick surface all while deepening the flavors of the foods being cooked.So, just by cooking in the cast iron skillet, you naturally season the pan; which, in turn seasons the food.
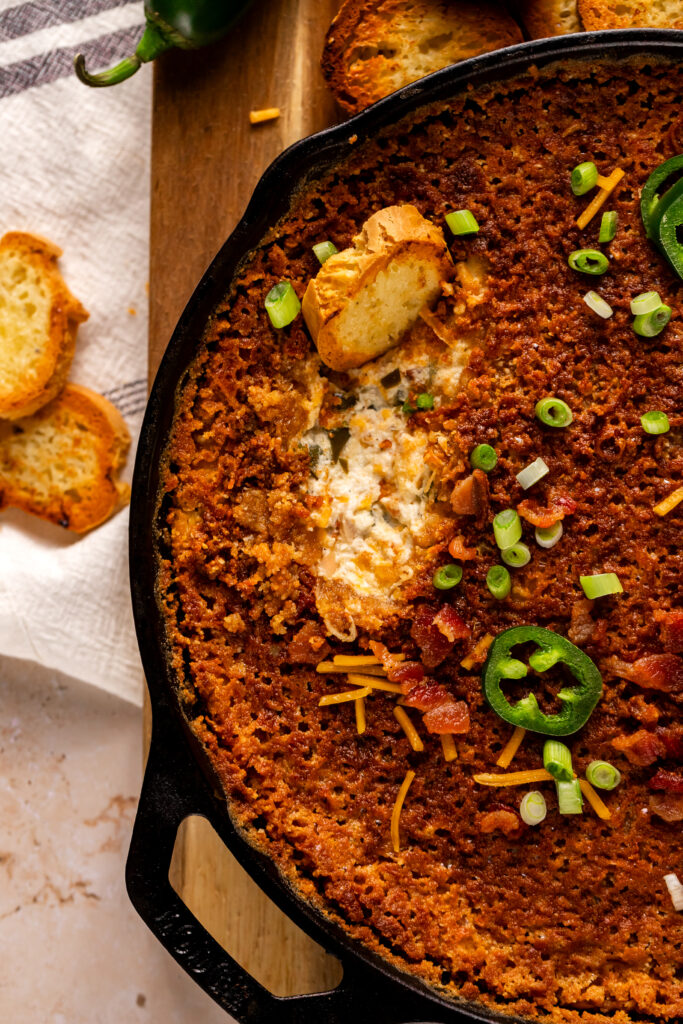
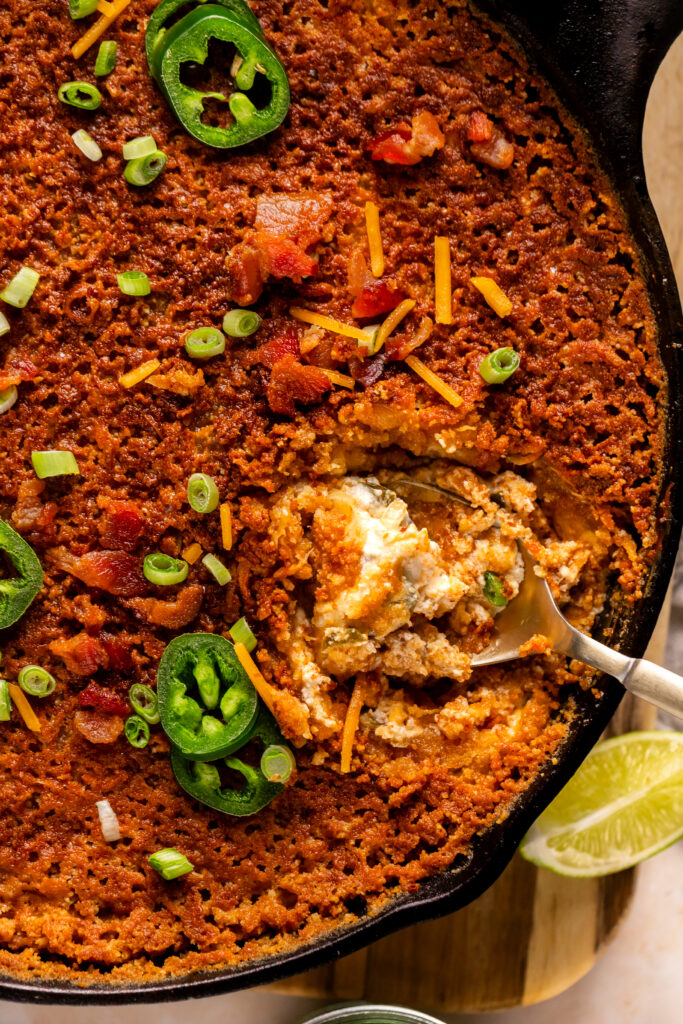
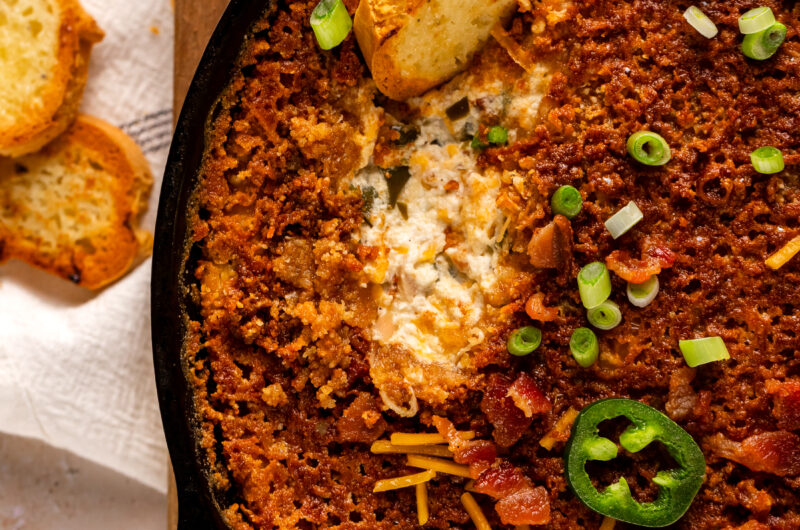
Finally, the last component that makes this recipe extra addicting is the crunchy top. You may notice from the pictures that the top looks crunchy and broiled with a creamy interior. This crunchy top is a combination of parmesan cheese, gluten-free breadcrumbs, and melted butter! When combined and then baked, it gives the dip a thin but crispy exterior that really ties the whole dish together! It adds the perfect textural element, along with another layer of flavor, to this dish.
Ingredients
Here is everything you will need in order to make this delicious dip!
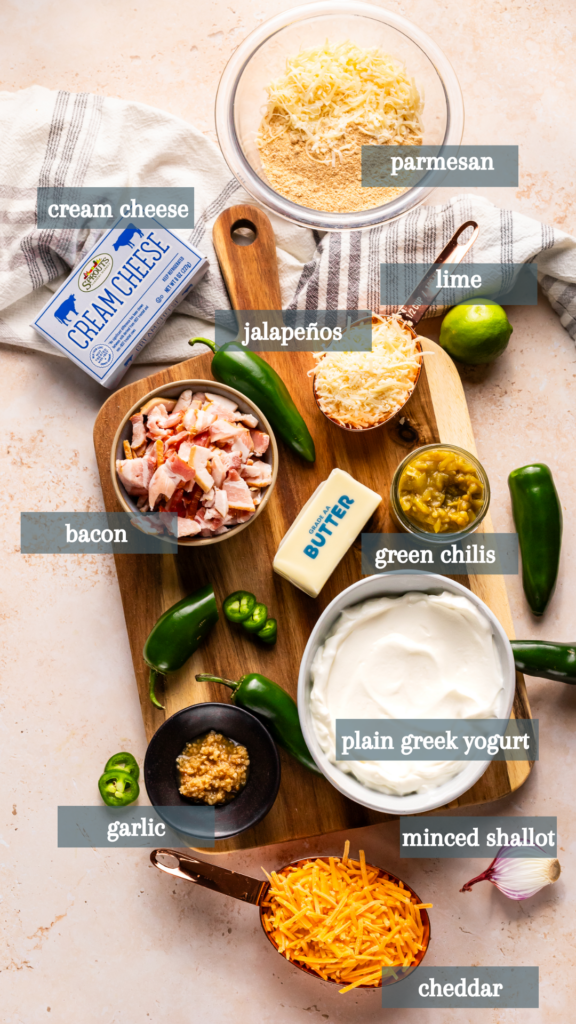
Ingredients for the Dip
- Bacon: adding a crispiness to the dish along with the perfect amount of saltiness
- Jalapeños, cleaned and diced plus more for topping if desired: for a kick!
- Shallot, minced: adding onto the flavor profile
- Green chilis, diced: this will compliment the shallot
- Lime juice: adding a slight "zing" to the dish
- Pepper: for flavor
- Garlic, minced: goes hand in hand with the green chilis and shallot
- Cream cheese, room temperature and softened: to create the perfect creamy dip
- Plain Greek yogurt: adding onto the consistency of the dip
- Cheddar cheese, freshly shredded: what's a dip without cheese?
- Parmesan cheese, freshly shredded: building off of the cheddar flavor
Ingredients for the Topping
- Gluten-free breadcrumbs: for a crunchy top
- Parmesan cheese, grated: extra stringy dip, and to hold the topping together
- Unsalted butter, melted: added flavor and salt
- Garlic powder: to perfectly tie it in with the dip itself
See recipe card for quantities
Why Greek Yogurt?
It might sound a little adventurous to substitute sour cream for greek yogurt. However, it truly does do a great job of naturally mimicking the flavor and consistency of sour cream. Personally, I prefer to use greek yogurt over sour cream in both cooking and baking. I find that the greek yogurt completes the job of sour cream, while being a healthier alternative at the same time. For example, it keeps baked goods light and moist, along with adding a hint of tanginess.
Greek yogurt is used in this Jalapeño Popper Dip to help balance out the heaviness of the cream cheese. You can't have jalapeño popper dip without cream cheese, and although this recipe only used eight ounces, cream cheese is overall a very heavy ingredient. Greek yogurt helps to lighten the flavor and consistency of both the cream cheese and the additional shredded parmesan and cheddar cheese. As well, greek yogurt provides the dip with a bit of tang. This will add an extra layer of flavor and depth that sour cream can't replicate.
Just remember to use plain, unsweetened greek yogurt in this recipe. It'll really lighten up the dip, while maintaining that creamy consistency that we love. The tanginess of the greek yogurt also brings out those fresh, vibrant flavors of the lime juice. Again, this helps to lighten the dip and add another layer of flavor to our recipe.
Preparing the Jalapeños and Other Ingredients
Before we can get to the dip, we have to address the star of the dish! While the jalapeños will be incorporated into the dip later in this recipe, we first need to prepare them. If you've bit into a jalapeño before, then you know the seeds are where most of the heat is. Start by slicing the jalapeño in half, lengthwise. Then, cut off the stem and carefully remove the seeds from the center of the vegetable. Once you remove the seeds, wash the jalapeño and then dice. Repeat this process with a total of four jalapeños- six if you're feel adventurous.
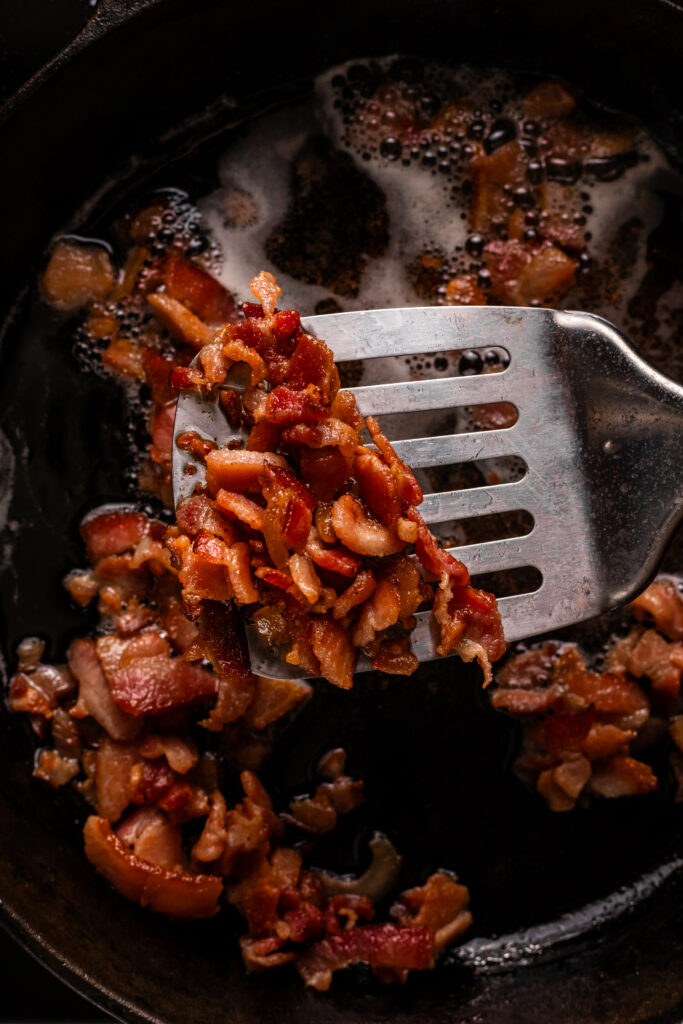
Once the jalapeños are diced, set them to the side. Next, mince one shallot and three cloves of garlic. Be sure to mince them separately, as they will be added to the dip in different steps. Finally, roughly chop seven long strips of bacon. You don't have to cut the bacon into perfect pieces as we will later crumble the bacon. We will first cook the bacon, then add the other ingredients.
Building the Flavor Profile
First, preheat the oven to 375 degrees Fahrenheit and lightly oil a 9" cast iron skillet. Then, heat the cast iron skillet over medium-high heat. Using a cast iron skillet is a crucial aspect of this recipe. As previously mentioned, cooking in a cast iron skillet will allow us to build on layers of flavors. We'll start by adding the chopped bacon to the skillet once it's hot. Cook the bacon in the skillet over medium-high heat until throughly cooked. This should take about five to seven minutes. Once finished, transfer to a paper towel lined plate to cool down.
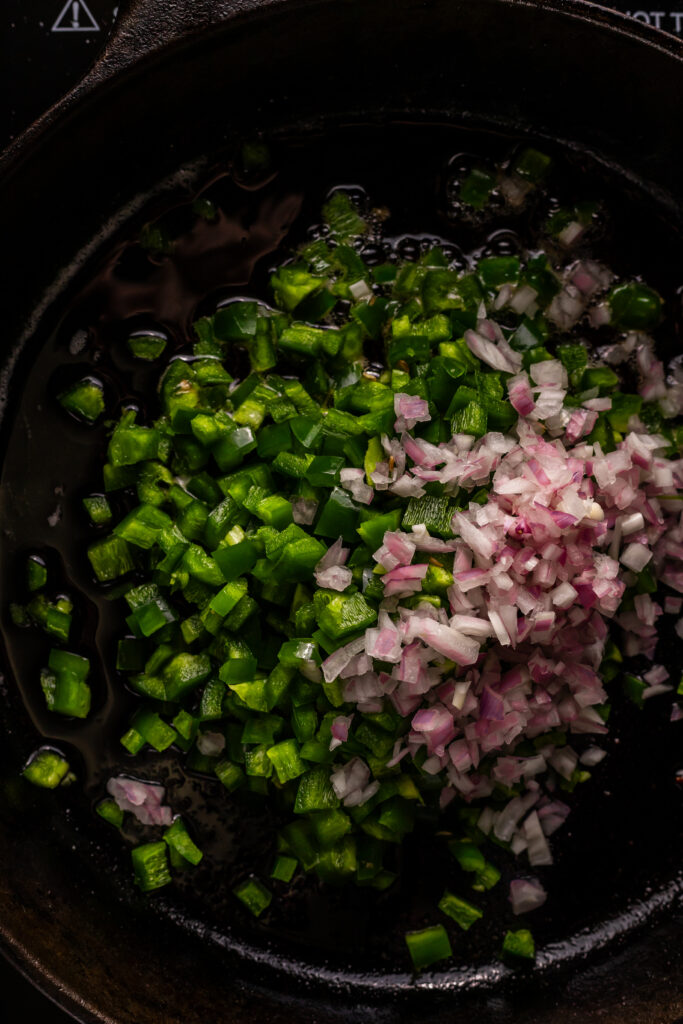
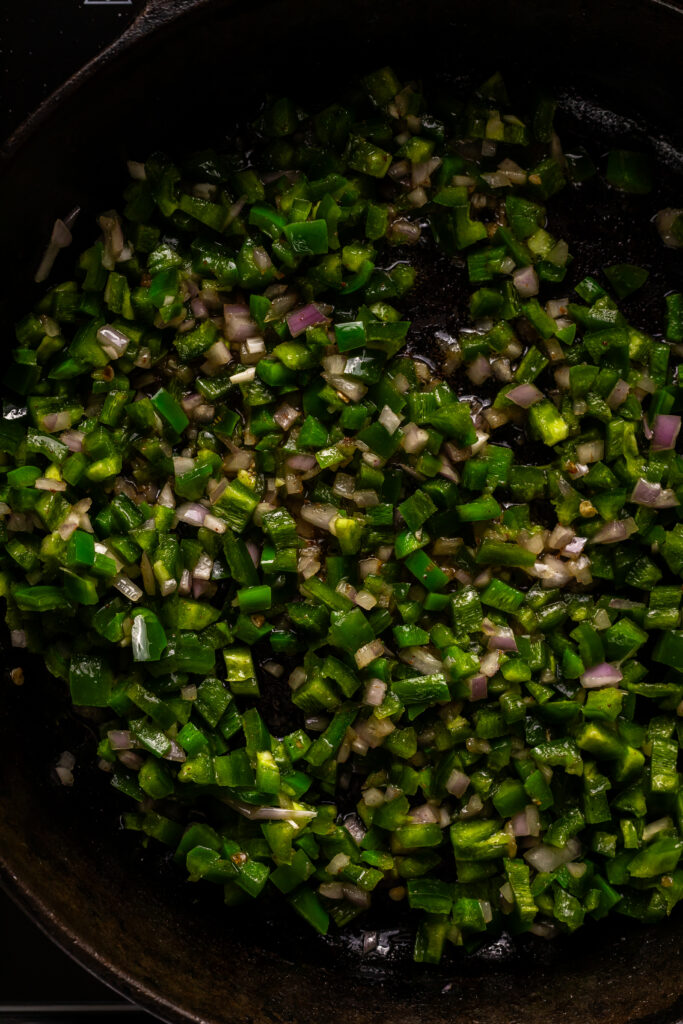
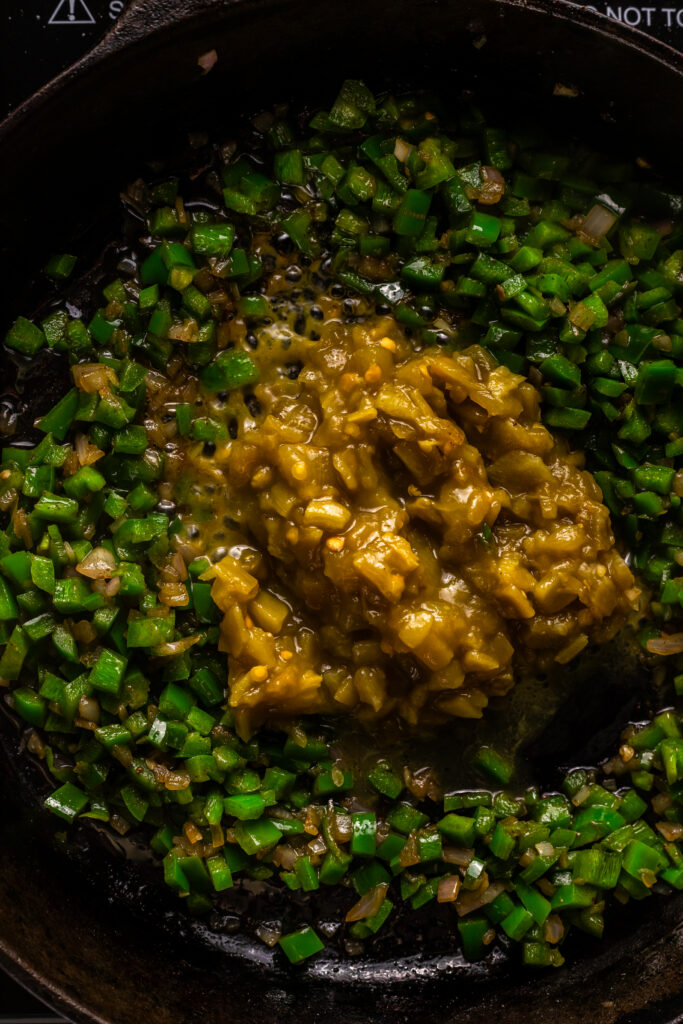
Reduce the heat to medium and add your jalapeños and minced shallot. No need to add in additional seasonings or butter in this process. Cooking the bacon first in the skillet provides us with delicious bacon grease to use as a fat component. Sautéing the vegetables in the grease imparts so much delicious flavor to the overall dip. Make sure to cook down the jalapeños and shallot for five minutes, stirring occasionally to prevent them from burning. Once cooked down, add in your green chilis and continue to sauté for another three to five minutes.
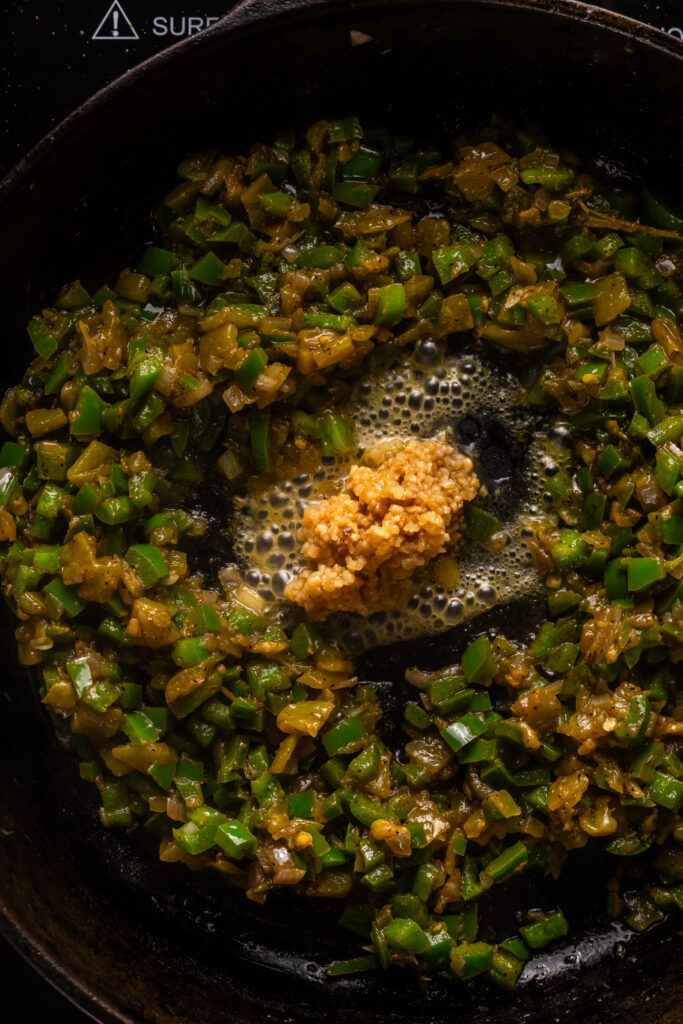
Next, it's time to season the vegetables. Season with just one teaspoon lime juice and half a teaspoon of black pepper pepper. We really want the natural flavors to shine through; which, is why we use the seasoning so sparingly. Stir to combine and once evenly coated, add in the garlic and sauté for another two minutes. Finally, remove the skillet from heat and allow to cool! We are not done with the skillet, so make sure to NOT wash it just yet! We will save that part for the very last step.
The Filling of the Dip
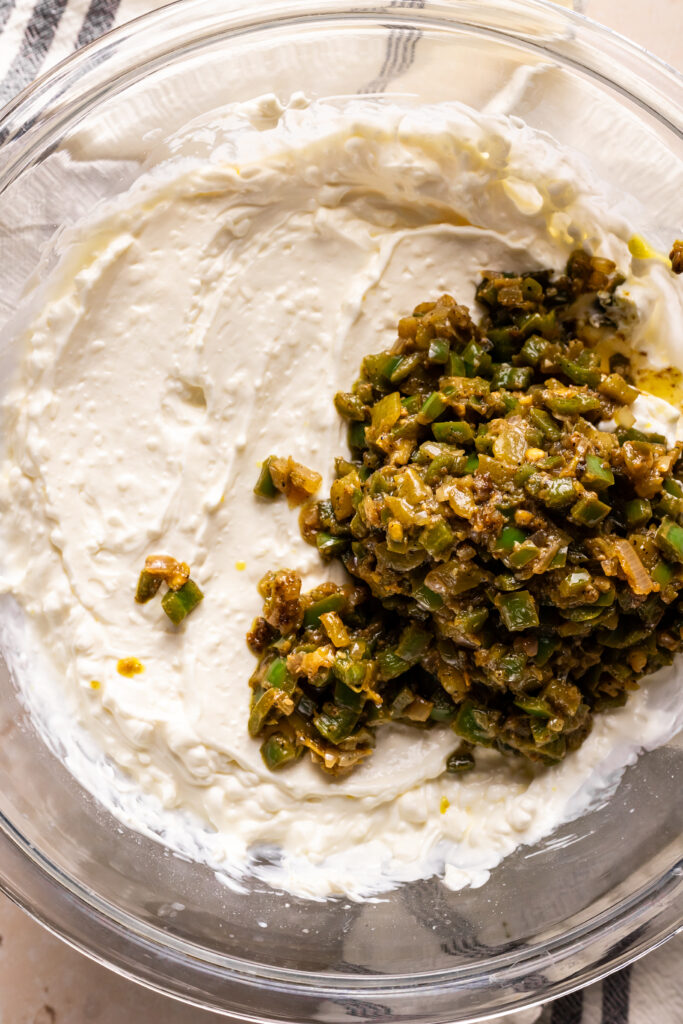
While the jalapeños, other vegetables and bacon are cooling, it's time to make the dip itself! Take a large bowl and add in one and a half cups of plain greek yogurt, eight ounces of softened cream cheese and the remaining lime juice. Use an electric mixer to incorporate until combined. If you do not have a mixer, you can use a wooden spoon to combine the ingredients. Softening up the cream cheese will only make this mixing process a lot easier, especially if mixing by hand!
Before continuing, take your cheddar cheese and freshly shred two cups worth. If you purchased your cheddar cheese pre-shredded, you can skip that part! However, I do recommend freshly shredded cheese as it melts better. Pre-shredded cheese comes with additives that disrupts the cheese from clumping together in its bag. Freshly shredded cheese won't contain those additives, which allows for an easier melting process, and creamier finish.
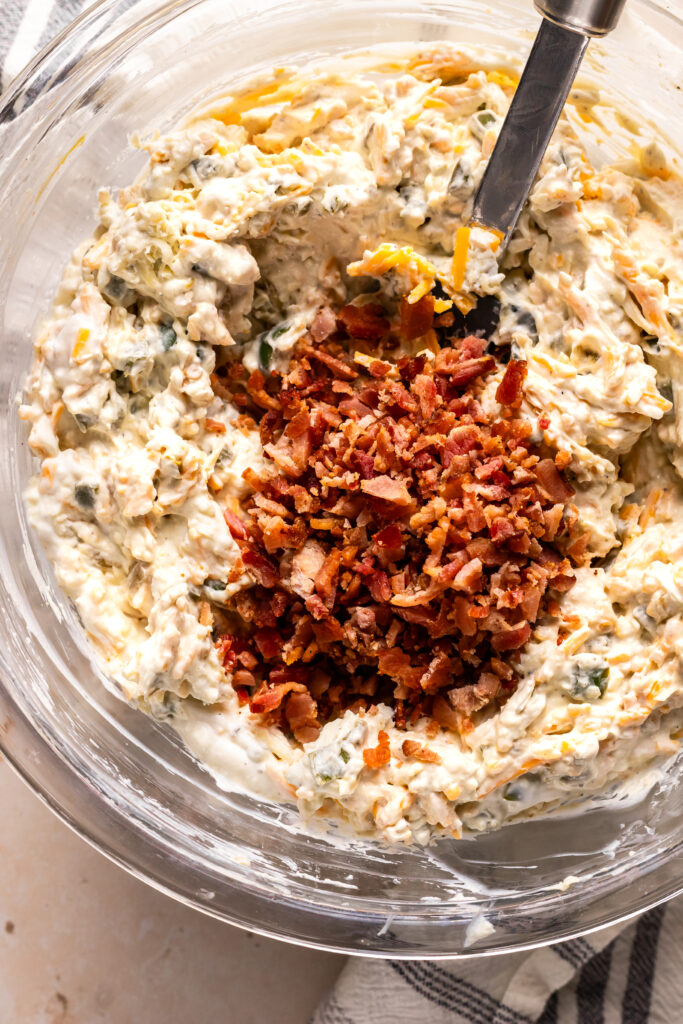
Then, use a spatula to first fold in the jalapeño mix with the two cups of freshly shredded cheddar cheese. You may want to add in just half of the cheese at a time to make it easier to evenly incorporate into the dip. This will ensure that everything is evenly distributed. Next, fold the bacon into the dip and transfer this filling to that same 9" cast iron skillet we used to sauté our vegetables. By using the same cast iron skillet to bake our dip, we are now able to incorporate all of the flavors from previous steps. This allows us to perfectly build on the layers of savory flavors.
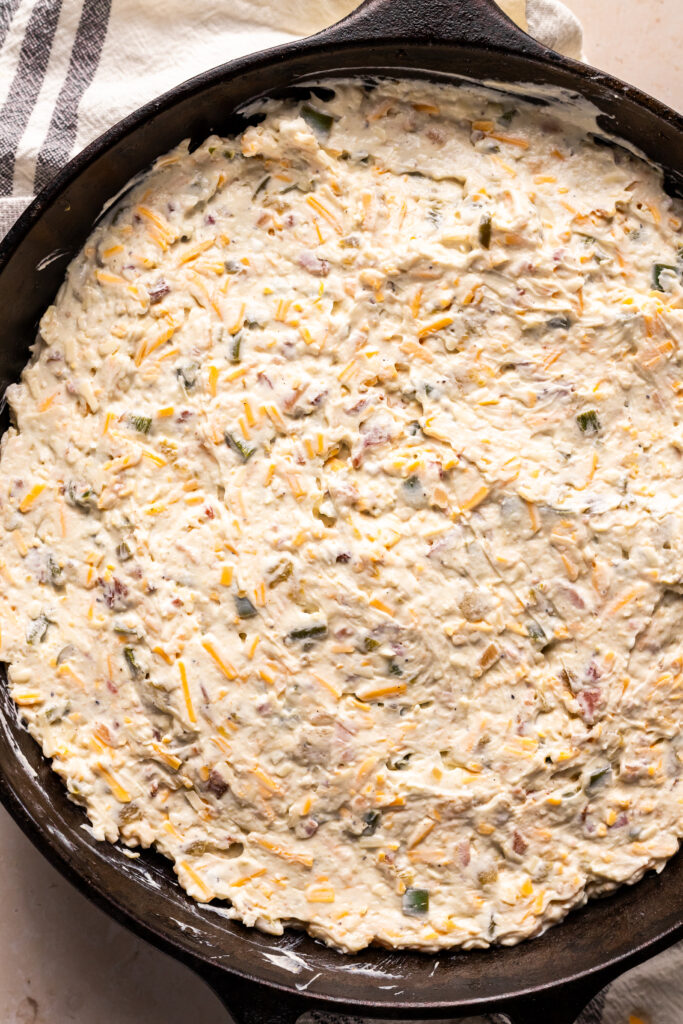
The Final Step: The Topping
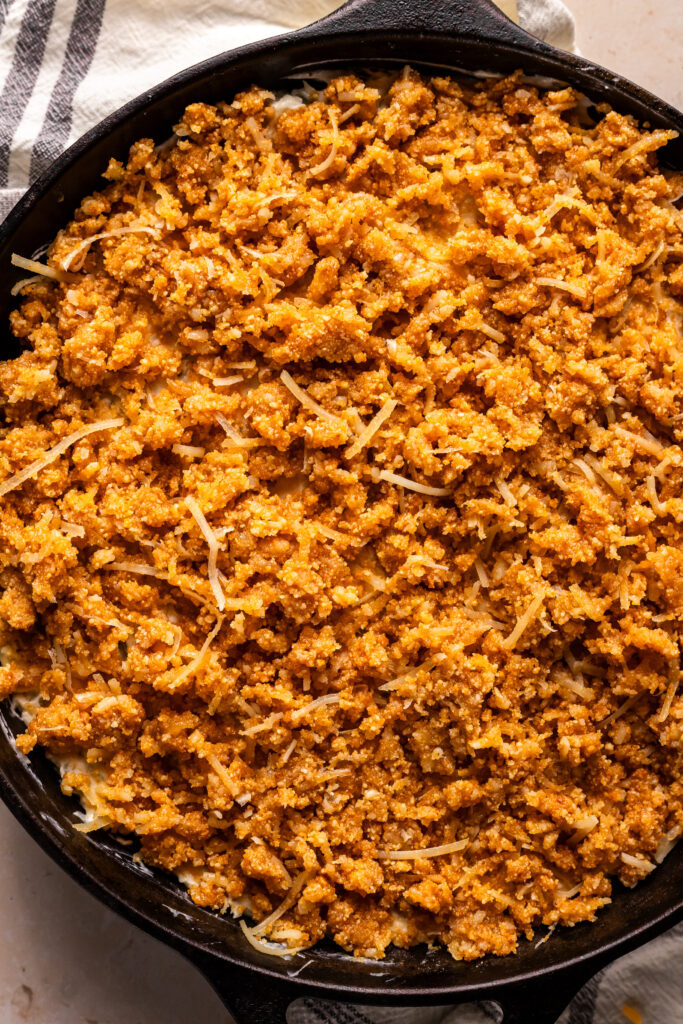
Don't worry, we're almost done! The last thing to do before we pop this jalapeño popper dip in the oven is to make the topping. Start by pouring one cup of gluten-free breadcrumbs in a small bowl. Then, add three fourths cup of freshly shredded parmesan cheese, six tablespoons of melted butter and two teaspoons of garlic powder. Mix the ingredients in the bowl, then spread a thin layer over the dip. As much as possible, try to create an even layer. If the mixture begins to clump over the dip, use a fork to break it up and disperse it.
Using this blend of gluten-free breadcrumbs and parmesan cheese will ensure that we don't have an overly cheese-y dip. There is already a fair bit of cheese incorporated, so we don't need an overly cheesy topping. The addition of the parmesan will also compliment the sharp cheddar cheese flavors. As well, the breadcrumbs will give the dip an amazing crust! It will add more texture and yield a more impactful appetizer. The breadcrumbs I used in this recipe are linked here for your convenience.
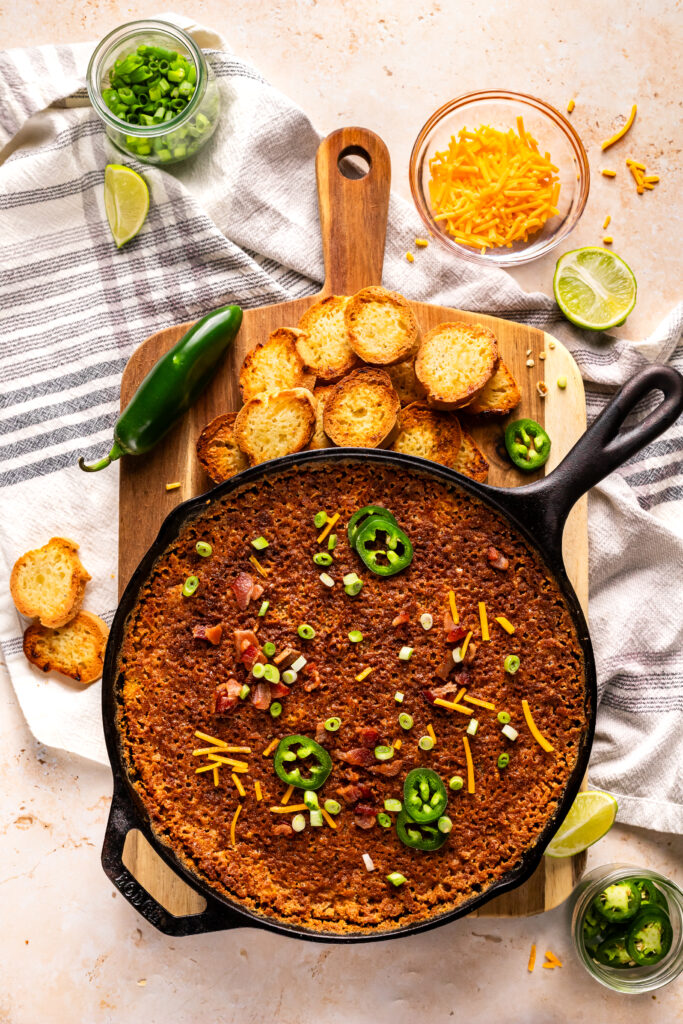
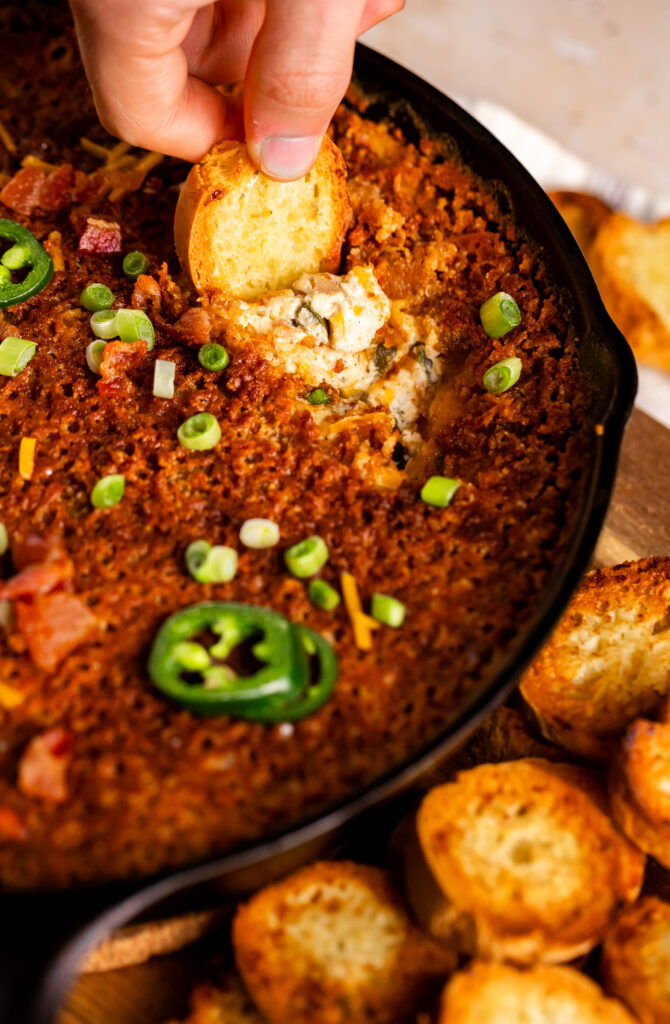
Now it's finally time to pop the dip in the oven and bake for 20 minutes at 375 degrees Fahrenheit on the center rack. Before pulling the dip out, broil it on high for two minutes. This final step will create that golden finish on the dip. Trust me, you don't want to miss this step! Once broiled to perfection, turn off the oven and allow the dip to cool for five to ten minutes before serving. Garnish with sliced jalapeños, crumbled bacon and green onions. Serve with toasted gluten-free crostinis or crackers and enjoy!
Cleaning Your Cast Iron Skillet
When it comes to cleaning a cast iron skillet, there are some do's and absolutely do not's. There is a specific way you must clean your skillet in order for it to continue functioning properly and to improve its longevity. A cast iron skillet is not like any other regular ceramic skillet as the coatings are different. Cast iron is much more porous meaning the way we clean it is a little more special. But no have no fear, it is quite simple and quick.
To start, you want to make sure to begin the cleaning process while the skillet is still hot. Using hot water, and no soap, you may begin to rinse off the pan. The hot water will loosen any left over food on the skillet that may be stuck. We want to avoid using soap as it will strip off the pan's seasoning. Even using the smallest amount of soap will still strip the skillet. After cleaning the pan with hot water, you might be left with some food still stuck. If that is so, simply take some Kosher salt and a dry paper towel. Use the salt and towel to scrub the skillet.
The last steps in cleaning the skillet are quite simple, however are very crucial. The way you dry your skillet will determine whether or not it will rust. To do so, simply place back in the oven and allow the remaining water to evaporate. You can also utilize the stove top to do the same thing. However, I prefer the oven method. Once your skillet is nice and dry, take some oil and apply a small amount to a paper towel. Use your oiled towel to wipe down the skillet. This is "seasoning" our skillet for the next time we cook with it. You may either hang your skillet for storage or place paper towels in between when stacking.
What To Do With Leftovers
If you have some of jalapeño popper dip left over, I have a few ideas for what you can do with it! Instead of stashing it away and eating leftover dip, let's incorporate it into other dishes. This is a perfect way to utilize the dip's flavors while creating something new. For something super simple and easy, you can stuff your chicken breast with the dip. Just slice a chicken breast in half and stuff with your jalapeño dip before baking in the oven! This is a great way to mix things up from the traditional roasted chicken breast and enhance the flavor.
If you are low on time/energy, storing the jalapeño dip as it is works just as well. I would just make sure to place your dip into an air tight container before storing in the refrigerator. This dip can last for about 5 days in the refrigerator. Pull it out anytime to enjoy some dip for the coming days! To reheat, just scoop your dip into a microwave-safe bowl and cover with a paper towel before heating for one minute. I recommended stirring in between. Then, your dip is ready to be enjoyed!
How To Turn This Dip Into Chili
Personally, my favorite way to use leftover jalapeño popper dip is to create a chili recipe with it. I use my white chicken chili recipe as a basis to build off of. Using the jalapeño popper dip saves you a few steps in developing the flavor of the chili. Kind of like an instant cheatsheet to flavor! I would note that adding the jalapeño dip will decrease the healthiness of my white chicken chili recipe. However, the flavors would be absolutely amazing! Here's how I use this dip to create a white chicken chili:
- Use a spoon to discard the topping of the remaining jalapeño popper dip. We want to avoid adding in the breadcrumb layer as it'll change the consistency of the chili. Then, add the dip to a large pot or Dutch oven.
- Heat the dip over medium-high heat and add two to four cups of chicken broth. The amount of broth needed will depend on how much jalapeño popper dip you have leftover. You can add more broth as you go. Note that the broth will also yield more chili, but also thin it out.
- Add in roughly one to two cups of shredded rotisserie chicken, one 15 ounce can of corn, and one to two cups of white beans. Stir to combine until the chili has reached the desired consistency.
That's it! In just three steps, you can transfer your jalapeño popper dip into a delicious, creamy white chicken chili. Finish your chili by topping it with freshly minced cilantro and crunchy tortilla shreds.

The Perfect Pairings
This recipe is the only dip needed for Super Bowl Sunday, or really any game day party! I also encourage utilizing this jalapeño popper dip for Friendsgivings, BBQ gatherings and potlucks. It is a great dish to easily throw into a portable container and share with plenty of friends and family. Dips are always the first to go and I guarantee that no one will be able to resist this Jalapeño Popper Dip!
There are a few other dishes I would highly recommend pairing with this jalapeño popper dip.

Related
Super Bowl Sunday, or whatever it is you've got a gathering for, you might want some more appetizer recipes! You can never have enough snacking plates. Here are some of my favorite related dishes you can incorporate with the Jalapeño Popper Dip:
- The Best Gluten-Free Ham and Cheese Pinwheel Recipe
- Gluten-Free Pear and Walnut Tart
- Creamy Whipped Eggplant
- Hearty Baba Ghanoush


Easy & Mild Jalapeño Popper Dip
Course: AppetizersDifficulty: Easy10+
Servings15
minutes35
minutesThis dip is a must try for your next party! It's mild in heat but loaded with flavor and so easy to make!
Ingredients
- Ingredients for the Dip
7 strips of bacon
5 large jalapeños, cleaned and diced plus more for topping if desired
1 shallot, minced
1 4oz can of green chilis, diced
1 tablespoon + 1 teaspoon lime juice
½ teaspoon pepper
3 cloves of garlic, minced
8oz. cream cheese, room temperature and softened
1 ½ cups plain Greek yogurt
2 cups of cheddar cheese, freshly shredded
¾ cup of parmesan cheese, freshly shredded
- Ingredients for the Topping
1 cup of gluten-free breadcrumbs
¾ cup parmesan cheese, grated
6 tablespoons of unsalted butter, melted
2 teaspoons garlic powder
Directions
- Preheat the oven to 375 degrees Fahrenheit and lightly oil a 9" cast iron skillet.
- Prepare the vegetables by dicing the jalapeños, then mincing the shallot and garlic. Set to the side.
- Roughly chop the bacon and add to a cast iron skillet. Cook over medium-high heat until thoroughly cooked, roughly 5-7 minutes.
- Transfer to a paper towel lined plate to cool. Reduce the heat to medium, then add the jalapeños and minced shallot.
- Cook down in the bacon grease for five minutes. Then, add the green chilis and continue to cook for three to five more minutes.
- Season with one teaspoon lime juice and pepper. Stir to combine, then add the garlic and sauté for two minutes. Finally, remove from heat and allow to cool.
- Combine the Greek yogurt, softened cream cheese, and remaining lime juice in a large bowl. Use an electric mixer to incorporate.
- Next use a spatula to first fold in the jalapeño mix, then the freshly shredded cheddar cheese. You can add half the cheese at a time to make it easier to evenly incorporate into the dip.
- Dice the bacon until it's crumbled. Reserve at least one tablespoon for topping before adding the rest to the bowl.
- Fold the bacon into the dip, then transfer the dip to the same 9" skillet used to sauté the vegetables.
- To make the topping, mix together the breadcrumbs, parmesan cheese, melted butter and garlic powder.
- Spread a thin, even layer over the top of the jalapeño dip.
- Then, bake at 375 degrees Fahrenheit for 20 minutes on the center rack. After the allotted time, broil on high for two minutes.
- Once golden and broiled, turn off the oven and remove the dip. Allow to cool for 5-10 minutes before garnishing with sliced jalapeños, crumbled bacon and green onions.
- Finally serve with toasted gluten-free crostinis or crackers and enjoy!
Recipe Video
Notes
- Store in an air-tight container for up to five days


Leave a Reply