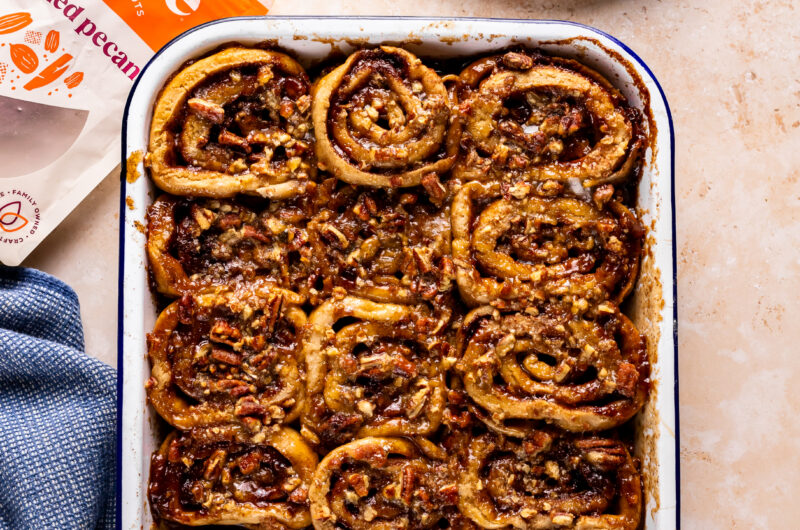
If you're a fan of cinnamon rolls, then you're going to fall in love with these gluten-free sticky buns! This sweet breakfast recipe features candied pecans that create an irresistible bite!
Jump to RecipeA Sweet and Cozy Breakfast Treat
There are few better ways to start your morning off right than with a homemade baked good! Sometimes the typical go-to breakfast of yogurt or eggs just won't cut it and you just need a sweet treat to start your day. Well you're in luck because I have the perfect recipe for those kinds of days. This Gluten-Free Sticky Bun recipe is the perfect combination of sweet, cozy, and oh so delicious.
These sticky buns feature a homemade dough, layered with a brown sugar glaze and candied pecans from Santé Nuts. The soft interior of the gluten-free sticky buns paired with the crunch of the pecans, makes the texture of these buns irresistible. Plus, the combination of flavor makes each bite more addicting than the last. It's hard to resist only having one of these mouth-watering sticky buns- luckily, this recipe yields 15 individual buns, so everyone can have seconds or even thirds!
If you're not hooked yet, just wait until you see how scrumptious this recipe looks. And trust me when I say, these sticky buns tastes even better than they look! Are you convinced now? If so, keep reading to discover the step-by-step instructions to making the perfect gluten-free sticky buns. Prepare yourself to be surprised by how straight forward and easy to follow this recipe is.

What are Sticky Buns?
Believe it or not, but sticky buns have actually been around and enjoyed since the Middle Ages when cinnamon became more prominent! Germany is credited with the origin of sticky buns, and later the Pennsylvania Dutch introduced sticky buns to the United States. They were called "Schnecken" in German; which, loosely translates to a sweet bun containing raisins. Sticky buns also have a counterpart in Venezuela with a similar make up. However, the Venezuelan sticky bun known as "golfeado" includes a freshly ground cheese on top of the bun that encompass a more sweet-salty taste.
Now, you may be wondering if cinnamon rolls and sticky buns are the same thing with just different name. But there are actually a few differences that make the two unique! To start, the baking methods between the two differ slightly. Sticky buns are made with a dough that is filled with butter and brown sugar, layered with glaze and nuts. Whereas the glaze is added after fully baking the cinnamon rolls, and they traditionally don't contain nuts. Also, sticky buns don't always include cinnamon! As you know, cinnamon rolls rely on the spice to give the recipe its signature flavor.
Starting the Sticky Buns
Let's get going on this delicious, gluten-free sticky buns recipe! First things first, we have to start with the most important aspect of this recipe: our yeast mixture. We will be using one packet of active dried yeast. There are a few great things about using this particular type of yeast. One of the main positive attributes is that is extends the shelf life of the final product! And, because it is a dried active yeast, it does not need to be refrigerated. The dried active yeast will also enhance texture, rise, and flavor of the sticky buns.
First, add the water to a small, microwave-safe bowl and heat until it reaches 110-115 degrees. This warm water will allow the yeast to activate. Anything too cold and it won't activate, while anything too hot will kill the yeast. So, be sure you are precise with the water temperature. Stir in one tablespoon of sugar, then add the active dry yeast. Sounds a little funny, but the reason why we add sugar is to add nutrition for the yeast. Yeast will produce enzymes that will react with the sugar thus giving it the energy it needs to fully activate and do what it needs to do for our recipe!
Mix again and allow it to sit for 10 minutes until the yeast has activated. The mixture will begin to foam and smell yeasty when activated. This smell most commonly resembles the scent of beer. As for the foam, it will have a light grey hue to it and cover the width of the bowl. If this does not happen in the 10 minute span, then start over as the yeast did not activate. Without this step, our sticky bun recipe wouldn't work. So, do not rush the yeast activation process or assume the yeast has activated if it does not have the yeasty aroma or foam.
If the Yeast Doesn't Activate...
If you find that your yeast has not activated, it could be for a few reasons. Check to see if your yeast has expired! Trust me, this has happened more often that not. Another reason your yeast didn't activate was because your water was too hot and killed off your yeast. Anything over 115 degrees Fahrenheit is too hot an environment for the yeast to activate in. Or, maybe the water was too cold. It is a bit of a goldilocks situation when it comes to the yeast. It truly needs to be just right or the yeast won't activate. It is also possible that you just didn't give it enough time to fully activate. While many recipes recommend the yeast only needs five to eight minutes, it's best to give it the full 10 minutes. Going through this list can ensure you don't go wrong and are capable of activating your yeast with ease- or at least find the root of the problem quicker!


The Blend of Dry Ingredients
Now that we've covered the yeast, it's time to go through the list of dry ingredients. I like to compile the dry ingredients while the yeast is activating, so that I have everything ready to go. For the dry ingredients, we'll be using a blend of a number of different items to create the perfect base for our gluten-free sticky buns. In a large mixing bowl, add the remaining sugar, gluten-free all-purpose flour, tapioca flour, baking powder, psyllium husk powder, salt, and xanthin gum. Mix together, then set to the side.
Let's talk about why we use a few of these ingredients! For starters, we are using a gluten-free all-purpose flour as our primary dry ingredient to create the best texture and perfect consistency for these gluten-free sticky buns. For this recipe, I used the King Arthur Gluten-Free All-Purpose Flour. Being light and soft, this type of flour yields the best texture for the buns. However, if you can't find this flour, then I recommend using the Gluten Free All-Purpose Baking Flour from Bob's Red Mill. In addition, we will be using tapioca flour to act as a thickening agent for our dough. A nice thick dough will yield the perfect bite!
We'll be using another binder in this recipe called psyllium husk powder. This is a key to gluten-free baking as it provides the gluten-free dough with the elasticity and flexibility that is needed to actually knead and shape without breaking. This will also allow the sticky buns to bake without cracking. Finally, we'll be adding a touch of xanthin gum. Again, this will add thickness and viscosity to our gluten-free flour friend. Both the flour and tapioca flour do not contain xanthan gum. Without it, your bread will fall flat, run dry and become crumbly. Most importantly, it will not yield the desired consistency and thickness that we need our gluten-free sticky buns to have.
Adding the Wet Ingredients
This section is the easiest part of the whole recipe! For the wet ingredients, we'll be using butter, milk, and eggs. First melt the butter, then allow it to cool to room temperature. While the butter is cooling, warm the milk until it's lukewarm and add it to a large mixing bowl. Add the eggs, then whisk on medium-low speed to combine. Once the butter has cooled, add it to the bowl and mix again. At this point, the yeast should be activated and foamy. Add it to the bowl and mix one more time to combine all the wet ingredients.
Now, it's time to incorporate our blend of dry ingredients. Start by adding half of the dry ingredients to the wet ingredients and mix on low speed to combine. Next, add the rest of the dry ingredients and mix again until the wet and dry ingredients are fully incorporated. Continue to mix until a soft dough has formed. The dough should be sticky, but not too wet. If it's wet and very sticky, add a little more flour. I like to add one fourth cup of flour at a time and mix before adding more. This ensures that we're not adding too much flour at once and overwhelming the dough, as this can dry it out.
Now use your hands or a dough hook to knead the dough. If you use your hands, you'll need to knead the dough for six to eight minutes on a lightly floured surface. If you use a dough hook, knead the dough for three to five minutes on medium-low speed. The dough should be sticky, but not sticking to the bowl. It's okay if the dough is sticky to the dough hook. You want it to be slightly sticky but able to come off with little effort or work. If the dough is sticking to your hands or the dough hook and won't release with ease, then add some more flour in small measurements until the desired stickiness.


The First Proof
Once the dough comes clean from the side of the bowl, it's ready for the next step! Transfer the dough to a warm, oiled bowl and cover with plastic wrap or a tea towel. Place in a warm environment for one to two hours until it doubles in size. You can also use the proof setting on your oven for this section. If you don't have a proof setting, then preheat the oven to 125 degrees Fahrenheit, turn it off and then put the oven-safe bowl with the dough in the oven to proof. You just want to ensure that the dough is in a warm, draft-free spot where it can rise. Much like the yeast, you want to ensure that the spot isn't too hot, just warm enough to yield a fluffy dough.
What exactly is the important of proofing our dough? Proofing is a baking technique that is used to allow a yeast bread to rest and rise in preparation for baking. This is when the yeast ferments the dough and produces gases. This then allows the dough to rise and creates a nice light, soft texture. Using a warm and greased bowl will also prevent our dough from sticking to our bowl and ruining the integrity of the dough. There are a few different methods to proofing a yeast bread, some include letting the dough rest in warm environment for a few hours, or speeding up the process with using the proofing in the oven method.
Creating the First Layer of Flavor
After the dough has sat for the allotted time and doubled in size, transfer to a lightly floured surface. I like to work off of two pieces of parchment paper and dust those. Dust the dough with more flour before using a rolling pin to roll out the dough. Roll the dough with a rolling pin until it's roughly 16 inches long and 12 inches wide with a thickness of ⅓ inches. The dough should still be fluffy and roll fairly easily. Once the dough is rolled to the desired length and width, it's time to create the first layer of flavor! We will be adding a layer of melted butter before sprinkling the dough with a cinnamon and sugar mixture. This is the step most similar to creating cinnamon rolls.
First, brush the melted butter over the dough. Ensure the butter isn't too warm, a simple lukewarm temperature will do! In a small bowl, we will create the filling for our dough. In said bowl, combine the sugar, cinnamon and nutmeg. Once fully combined, sprinkle over the entirety of the rolled out dough. You want to sprinkle the edges of the dough, too. Then, run the spoon over the mixture to integrate it with the melted butter. This will also help to prevent the filling from spilling out in the next step. Next up will be rolling and cutting the dough to create the final shape!


How to Roll and Cut the Dough
This step is often viewed as the most intimidating but also one of the best steps because we get to see the sticky buns take shape! As well, we're one step closer to our finished product. Just remember to work slow and you'll be onto the next step in no time. First, slowly take one end of the long side of the dough and roll it down to the other edge. You want to roll the dough either up or down instead of left or right. Essentially, the dough should be rolled length-wise. If you rolled your dough out on parchment paper, you can use the parchment to help you tightly roll your dough. I find this is a huge help!
Once rolled, use a sharp knife or pizza cutter to slice the dough into 1 ½" slices. Before doing so, I like to slice the ends of the dough off. These are typically the sections of the dough that aren't as pretty. However, you can keep them if you'd like! Another method to cutting your rolls includes the floss method! As mentioned in this blog, you simply take some floss in each hand and cross the two over each other to slice through the dough. This is just another easy way to get perfectly cut rolls! The choice is up to you, as any option works well! Once you cut the sticky buns into their individual shapes, leave them be for a minute while we work on the next step.
How to Make the Signature Sticky Buns Topping
This is arguably the best part! This is where the flavor really comes around. So, to start on the signature topping to these gluten-free sticky buns, we are going to add butter, brown sugar and maple syrup to a small saucepan. Cook over medium-low heat, whisking until the sugar dissolves. Then, add a pinch of salt to balance out the sweetness. Remove from heat and allow to cool for two to three minutes. Then, pour about ¼ cup of the sauce over a large baking pan. Add enough to cover the bottom of the pan and use the spoon to spread the sauce evenly. Reserve the rest of the sauce for the top of the sticky buns.
Then, place the sticky buns in the prepared baking pan. This recipe yields roughly 15 sticky buns, but don't be afraid to stack them close together! Cover your dough with a tea towel and place in a warm spot to rise for 30 minutes. While the gluten-free sticky buns are rising, preheat the oven to 350 degrees Fahrenheit. This final proof will allow our dough to continue to rise, and is an important step before baking the sticky buns. We also don't add our sauce over the top of the buns just yet. We need to wait until the last proof is completed. This is because the sauce would make bread too moist and it won't allow it to rise further. It will only break down and fall apart. So, remember to wait until after the last proof!

The Perfect Pecans
Finding and using the perfect pecans truly ties this whole recipe together! For these gluten-free sticky buns, I'm using the candied pecans from Santé Nuts to create the best topping! These pecans are my absolute favorite to use for a number of reasons. One, Santé Nuts is a family-owned company that produces small batches of nuts. Second, you are guaranteed a fresh batch every time! Finally, they are innovative with their nut flavors and each nut is seasoned by hand.
Santé Nuts has just about every flavor imaginable when it comes to their perfectly seasoned nuts. Not only do they have candied pecans, but also Sweet & Spicy Pecans, Bourbon Pecans, and even Pumpkin Spice! Each uniquely flavored pecan will produce a different outcome. Furthermore, I decided to opt for their candied pecans because they best suited the sweet flavor of the sticky buns. If you were looking for a pecan with more of a kick, I'd recommend using either the sweet & spicy or bourbon pecans. Or if you're making these sticky buns during fall, you can't go wrong with the pumpkin spice pecans!
Final Step Before Baking
Before we add the pecans, let's add our remaining glaze. At this point, the sticky buns have finished the second round of proofing and are ready to be fully assembled. Reheat the sauce and add the majority of the remaining sauce to the top of the sticky buns. You want to reserve almost one fourth of this sticky sauce to pour over the pecans once we add them. Then, roughly chop your chosen pecans from Santé Nuts before sprinkling them over the sticky buns. Finally, add the remainder of the brown sugar and maple syrup sauce over the pecans. This will prevent the pecans from burning during baking.
You are almost at the finished line! There's only one more thing to do before you finally get to enjoy a bite of these delicious, gluten-free sticky buns. It's officially time to bake these buns! At this point, the oven should be preheated. Transfer the baking pan with the sticky buns to the center rack and bake for 20-25 minutes until golden. This is where you get the enjoy the fragrant smells of your sticky buns baking filling your home! Remove the sticky buns from the oven and allow to cool for five to ten minutes before serving.

How to Store These Sticky Buns
I can guarantee you these gluten-free sticky buns will be a crowd favorite and nearly impossible to resist! They're oh so satisfying and filling without being overly sweet. They truly make for the perfect sweet breakfast and are complimented well by a savory component, like bacon or sausage. Plus, with 15 individual sticky buns, this recipe definitely feels a crowd!
If you end up having leftovers, be sure to store your sticky buns in an air tight container. You have two options in regards to where to store the sticky buns. First, you can store them in the refrigerator and they'll last up to a week. The only downside to being refrigerated is that the sticky buns will harden more and won't retain that same softness. If you store at room temperature, they will only last up to two days but will be a little softer and easier to reheat.
Reheating these sticky buns is a lot more simple than you might think. Unlike many recipes, I actually recommend avoiding using the oven to reheat these sticky buns. Reheating in the oven will actually overcook the already cooked buns. Instead, reheat in the microwave. This will soften the buns and re-melt the glaze. Not only is this method much faster but actually has a better end result!
If You Like This Recipe...
If you are a fan of this gluten-free sticky buns recipe, I've got a few more recipes featured on my blog that I think you'll love, too! The three recipes below have a similar flavor profile to that of the sticky buns. Each makes for a great sweet breakfast and, of course, is also gluten-free. Comment below to let me know which recipe you like best!
- Cinnamon Rolls: There are few things better than homemade cinnamon rolls. This small batch recipe of gluten-free rolls is sure to be an instant family favorite! These cinnamon rolls are fluffy, soft, buttery, and everything in between. Their texture mimics that of non-gluten free cinnamon rolls so well that family members won't know the difference!
- Monkey Bread: These soft, pillowy bites are the ideal breakfast for Christmas morning! These individual bite-sized pieces are coated in a cinnamon sugar mixture before being baked and glazed. This recipe is the perfect baked good to feed a crowd as it's so easy to share. Although, you may not want to with how tasty this monkey bread is!
- Coffee Cake: Who doesn't love a delicious slice of homemade coffee cake? This dairy-free and gluten-free recipe produces a moist, rich interior with a crumbly topping! This recipe features a soft interior with a streusel ribbon and crumbly topping that's finished with a drizzle of a homemade glaze.
If you're looking for a more savory breakfast, I'd recommend try my Croque Monsieur Breakfast Bake. Its not only such a delicious breakfast to make for yourself but also others. I love making this ahead of time if I know guests will be in town or during the holiday season when family time is abundant. It's the perfect casserole-style recipe to serve up to feed a crowd!

More Sante Nuts Recipes
Whether you're looking to try Santé Nuts for the first time or are already a fan, I have a code for you! Use my code "BOTTOMLESSPIT" for a discount of 15% off your entire order. As well, I have a number of other sweet and savory recipes on my blog featuring walnuts, almonds, and pecans from Santé Nuts. No matter your nut of choice, I have just the recipe for you!
- Oatmeal & Pecan Cookies: It's time to skip the raisins and chocolate chips. This Gluten-Free Oatmeal and Pecan Cookie recipe is a refreshing twist on the classic oatmeal cookie that you won't want to miss. These gourmet nuts have hints of toasty vanilla and sweet caramel. These flavors create a blend with the oatmeal and cinnamon that yields a perfectly balanced bite. And of course, the nuts themselves only enhance the nuttiness already in the oatmeal cookies!
- Pear and Walnut Tart: This recipe features ripe pears, honey, creamy brie cheese, fresh rosemary and candied walnuts. Combined, this gluten-free pear and walnut tart is the perfect savory baked good! This Gluten-Free Pear and Walnut Tart with rich brie cheese is drizzled with honey and finished with candied walnuts from Santé Nuts. It uses only five ingredients to create a balanced bite that will keep you coming back for more!
- Almond Butter and Chocolate Cups: These Almond Butter and Chocolate Cups feature dark chocolate and homemade almond butter for a healthier version of your favorite sweet treat! This recipe features a homemade almond butter that is a breeze to make and tastes as good, if not better, than store-bought brands. All you need is Santé Nuts almonds to get started!
If you're looking for a savory recipe to compliment these gluten-free sticky buns, I'd recommend trying either the Lemony Asparagus Risotto with leeks and garlic almonds or Autumn Kale and Pecan Salad. Either one of these dishes makes for the perfect side dish for a holiday or seasonal dinner.
Gluten-Free Sticky Buns with Pecans
Course: Dessert, Breakfast, BrunchDifficulty: Medium15
servings45
minutes25
minutes2
HoursThese Gluten-Free Sticky Buns are sure to become a fan-favorite recipe after just one bite!
Ingredients
- For the Dough
1 cup warm water
⅔ cup + 1 tablespoon granulated white sugar
1 packet active dried yeast (2 ¼ teaspoons)
4 ½ cups gluten-free all-purpose flour, plus more for dusting
1 cup tapioca flour
4 teaspoons psyllium husk powder
3 teaspoons baking powder
1 teaspoon salt
¾ teaspoon xanthan gum
1 cup warm milk
½ cup unsalted butter, melted and cooled
3 room temperature egg, whisked
- For the Filling
⅓ cup unsalted butter, melted
1 cup brown sugar
2 tablespoons cinnamon
2 teaspoons nutmeg
Pinch of salt
- For the Topping
¾ cup unsalted butter
¾ cup brown sugar
Pinch of salt
1 cups pecans, roughly chopped
Directions
- For the Dough
- Add the water to a small, microwave-safe bowl and heat until it reaches 110-115 degrees. Stir in one tablespoon of sugar, then add the active dry yeast. Mix again and allow it to sit for 10 minutes until the yeast has activated. The mixture will begin to foam and smell yeasty (beer-like) when activated. If this does not happen in the 10 minute span, then start over as the yeast did not activate.
- In a large mixing bowl, add the remaining sugar, flour, tapioca flour, psyllium husk powder, baking powder, salt, and xanthin gum. Mix together, then set to the side.
- For the wet ingredients, first melt the butter. Then, allow it to cool to room temperature.
- While the butter is cooling, warm the milk until it's lukewarm then add it to a large mixing bowl. Add the eggs, then whisk on medium-low speed to combine.
- Once the butter has cooled, add the butter and mix again. At this point, the yeast should be activated and foamy. Add it to the bowl and mix one more time to combine all the wet ingredients.
- Slowly add the dry ingredients, half at a time and mix between on medium-low speed to fully incorporate. Repeat until the dry and wet ingredients have been combined and a dough has formed. The dough should be sticky, but not too wet.
- Then, use your hands or a dough hook to knead the dough. If you use your hands, you'll need to knead the dough for 6-8 minutes. If you use a dough hook, knead the dough for 3-5 minutes on medium-low speed. The dough should be sticky, but not sticking to the bowl. If it is, then add a little more flour.
- Once the dough comes clean from the side of the bowl, it's ready for the next step. Transfer the dough to a warm, oiled bowl and cover with plastic wrap or a tea towel. Place in a warm environment for 1-2 hours until it doubles in size. You can also use the proof setting on your oven for this section. Or preheat the oven to 125 degrees Fahrenheit, turn it off and then put the oven-safe bowl with the dough in the oven to proof.
- For the Topping
- Add the butter, brown sugar and maple syrup to a small saucepan.
- Cook over medium-low heat, whisking until the sugar dissolves. Then, add a pinch of salt to balance the sweetness.
- Remove from heat and allow to cool for 2-3 minutes.
- Then, pour about ¼ cup of the sauce over a large baking pan. Add enough to cover the bottom of the pan.
- Reserve the rest of the sauce for the top of the sticky buns.
- For the Filling
- After the dough has sat for the allotted time and doubled in size, transfer to a lightly floured surface. Dust the dough with more flour before using a rolling pin to roll out the dough until it's roughly 16 inches long and 12 inches wide with a thickness of ⅓ inch.
- Brush the melted butter over the length of the dough. Then, combine the sugar, cinnamon and nutmeg in a small bowl and sprinkle over the entirety of the dough.
- Slowly take one end of the long side of the dough and roll it down to the other edge. You want to roll the dough either up or down instead of left or right.
- Once rolled, use a sharp knife to cut the dough into 1 ½" slices and place in the baking pan. Cover with a tea towel and place in a warm spot to rise for 30 minutes. While the sticky buns are rising, preheat the oven to 350 degrees Fahrenheit.
- Reheat the sauce and add the majority of remaining sauce to the top of the sticky buns. Then top with the chopped pecans. Drizzle the rest of the sauce over the pecans.
- Transfer the baking pan with the sticky buns to the center rack and bake for 20-25 minutes until golden.
- Remove the sticky buns from the oven and allow to cool for 5-10 minutes before serving.
Recipe Video
Notes
- Store in an airtight container in the refrigerator for up to one week or at room temperature for two days.


Leave a Reply