If you need a crowd pleasing recipe that will impress this holiday season, I have you covered with these gluten-free red velvet crinkle cookies!
Jump to RecipeA Sweet Treat
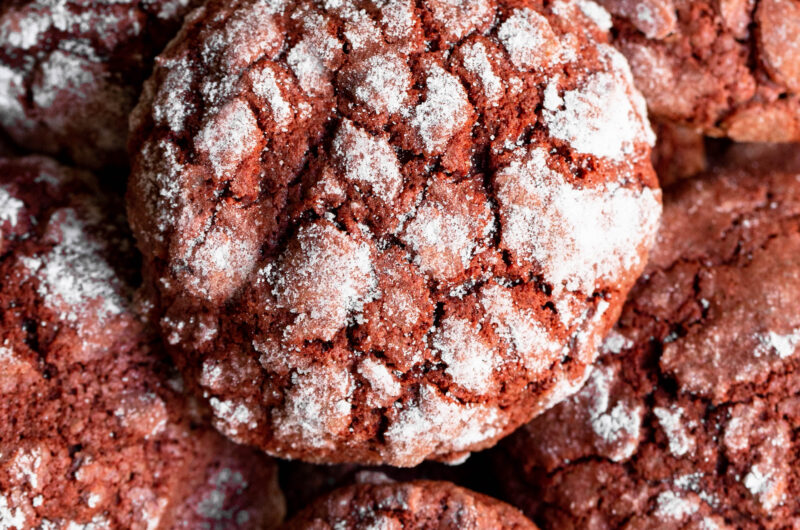
Red velvet cookies are the perfect decadent treat for any occasion! And during the holiday season, adding a little powdered sugar transforms this dessert into the delicious Red Velvet Crinkle Cookie. If you aren't familiar with the flavor profile, red velvet is simply made with aa small amount of cocoa powder and has a hint of vanilla. Red velvet desserts are often in cake or cupcake form and usually paired with a cream cheese frosting.
In this recipe we will be baking a cookie version! A perfect finger food to easily enjoy during the best time of year! It also makes for a great dessert to bring to gatherings, birthdays, celebrations, etc. This dessert is a fantastic crowd pleaser! The recipe yields cookies with aa slightly crispy outside and fluffy, light interior. I hope you enjoy this recipe as much as I do!

The Origin of the Iconic Red Velvet
To start, the original red velvet cake recipe actually is more well known today by the Waldorf-Astoria Hotel in New York City. However, it's often associated as a southern recipe as it first became popular in the more southern states. The red velvet cake was first inspired by the devil's food cake. They share many similarities but there are a few key differences. The main difference between a devil's food cake and a red velvet cake is the use of chocolate. Devil's food cake uses chocolate while red velvet only uses cocoa powder. Both are rich in flavor and incorporate a buttercream frosting. Traditionally, the red velvet cake is iced with a French Style ermine icing. That style of icing is very time consuming to make, so we've come up with a few other options. Now, it is popular to make cream cheese frostings to pair with red velvet.
Traditionally red velvet is baked in cake form but today there are many different variations! From red velvet cake pops and cookies, to cupcakes and even pancakes or crepe recipes! This dessert is usually brought around Christmas time or Valentines Day due to its festive color and flavor profile. However, it can most definitely be enjoyed year round!

Creating the Dry Ingredient Blend
To take a dive into this recipe, we will be starting with our dry ingredients. This recipe uses a gluten-free baking flour. I love the Bob's Red Mill Gluten Free 1-to-1 Baking Flour as it acts like regular flour with no extra hassle. We use gluten-free baking flour in this recipe because it yields the perfect consistency! As well, it already contains xanthin gum, so no need to add more! This flour will allow the red velvet cookies to have the slightly crispy exterior with a light and fluffy interior.
Take a sifter and sift together the baking flour, cocoa powder, baking powder, salt and baking soda into a bowl. Make sure that all ingredients are perfectly blended with an even texture (no lumps left in the mix). This will best prepare ourselves for an easier time mixing when we put in our wet ingredients. As well, it yields a more consistent batter. Set aside once sifted.
Putting Together The Wet Ingredients
In another bowl, add unsalted butter that's room temperature and softened. Then, pour in a blend of cane sugar and brown sugar. Blending the sugars creates the ideal sweetness for these cookies! Use an electric mixer on medium-low speed to cream together the butter and sugars for two to three minutes. Once perfectly blended, add two room temperature eggs and mix again. Remember, it's important to use room temperature eggs in baking as it affects the overall consistency of the red velvet crinkle cookies. Add in your almond milk, vanilla extract and red food coloring before mixing on low to combine. A little food coloring goes a long way! You really only need a teaspoon.
Once blended, sift in the dry ingredients. Sift in half at a time and mix in between each half. Once all combined, you should be left with a slightly sticky cookie dough. Make sure to chill the dough in the refrigerator for at least 30 minutes. Chilling the dough prevents the butter from spreading during baking. This allows for a firmer red velvet cookie. If you can chill the dough for an hour, that would be preferred, but 30 minutes is the minimum time necessary. Then, preheat the oven to 350 degrees Fahrenheit and line two large baking sheets with parchment paper.

Transforming from Red Velvet to Crinkle Cookies
After the allotted time, it's time to form the cookies. If you have a cookie scooper, make sure to use that for more consistent baking. It would be preferred to use a medium cookie scooper to shape the cookies. But if you do not have one, go ahead and make your cookies by hand as evenly as possible! Roll all of the cookies, then set to the side.
Now, it's time to make these cookies into red velvet crinkle cookies! To do so, all you'll need is a little powdered sugar in a bowl or plate. Simply add the powdered sugar to a bowl and roll each ball of cookie dough in the sugar before placing on the prepared baking sheet. When the cookie dough is baked, the cookie, along with the powdered sugar, will spread. This creates the signature "crinkle" look.
When your oven and cookies are ready to go, bake your red velvet crinkle cookies for 15-17 minutes. This is the sweet spot for the most perfectly cooked cookies that yields that ideal texture. Again, these should have a crispy exterior with a light and fluffy interior. Once your cookies are finished baking, allow to cool before enjoying.
Enjoying Your Red Velvet Crinkle Cookies
I can almost guarantee that these cookies will be all gone if brought for a gathering or celebration of any kind for others to enjoy. However, they're may be leftovers as this dessert is very rich! So, if you are left with some extra cookies to enjoy during the rest of the week, I would recommend storing in a sandwich bag and in your pantry! Cookies are such an easy dessert to store as they do not need to be refrigerated. Just seal them up in a bag and store in a dry area. Cookies also tend to last a good amount of time!
Red Velvet Crinkle Cookies
Course: DessertDifficulty: Easy18
servings15
minutes13
minutesThese easy to make, gluten-free Red Velvet Crinkle Cookies taste even better than they look!
Ingredients
2 cups of gluten-free baking flour
¼ cup of unsweetened cocoa powder
1 teaspoon of baking soda
½ teaspoon baking powder
¼ teaspoon of salt
½ cup unsalted butter, room temperature and softened
½ cup cane sugar
½ cup brown sugar
2 eggs, room temperature
2 teaspoons vanilla extract
1 teaspoon of red food coloring
¼ cup powdered sugar
Directions
- Preheat the oven to 350 degrees Fahrenheit and line two large baking sheets with parchment paper.
- Combine the dry ingredients in one bowl. Mix together the baking flour, cocoa powder, baking soda, baking powder and salt before setting to the side.
- In another bowl, add the softened butter, cane sugar, and brown sugar. Use an electric mixer on medium-low speed to cream together for two to three minutes.
- Then, add two room temperature eggs and mix again. Add the vanilla extract and red coloring before mixing on low to combine.
- Add the dry ingredients half at a time and mix between to thoroughly combine.
- Use a medium cookie scooper to shape the cookie dough.
- Add the powdered sugar to a bowl and roll each ball of cookie dough in the sugar before placing on the prepared baking sheet.
- Bake for 13-15 minutes, then enjoy!
Notes
- Store in an air tight container at room temperature up to six days


[…] Red Velvet Crinkle Cookies: Red velvet cookies are the perfect decadent treat for any occasion! If you aren't familiar with the flavor profile, red velvet is simply made with aa small amount of cocoa powder and has a hint of vanilla. Red velvet desserts are often in cake or cupcake form and usually paired with a cream cheese frosting. In this recipe we will be baking a cookie version! […]